“Every spring I get rhubarb, every spring I spend hours obsessing over what to do with it, only to reverse course in the final hours. This weird choice? Pistachio frangipane and cornmeal tart crust.”
– Sarah Jampel, Bon Appetit
A week or so ago I was scrolling through Instagram when I came across a post from Sarah Jampel featuring a stunning Rhubarb Pistachio Frangipane and Cornmeal Tart Crust. Even though I’ve watched every season of The Great British Bake Off, saved countless tart recipes on Pinterest, and traveled throughout Europe spending a lot of time in bakeries, I have actually never eaten a tart in my life. I don’t know what to say except that I grew up on boxed brownie mix, boxed cake mix, and nestle tollhouse cookie dough from a package in the refrigerated section. I’ve also only eaten rhubarb 2-3 times in my life. Again, I don’t know what to say except that it’s not a big produce in the south.
So, I found some rhubarb at the farmer’s market, and resolved that I was going to make this tart this week. My first big challenge, is that Sarah didn’t have an actual recipe to go along with the gorgeous view. So, I found some inspiration on Youtube from The Boy Who Bakes’ tart crust and pistachio frangipane as well as a rhubarb frangipane galette from Bon Appetit and combined the three!
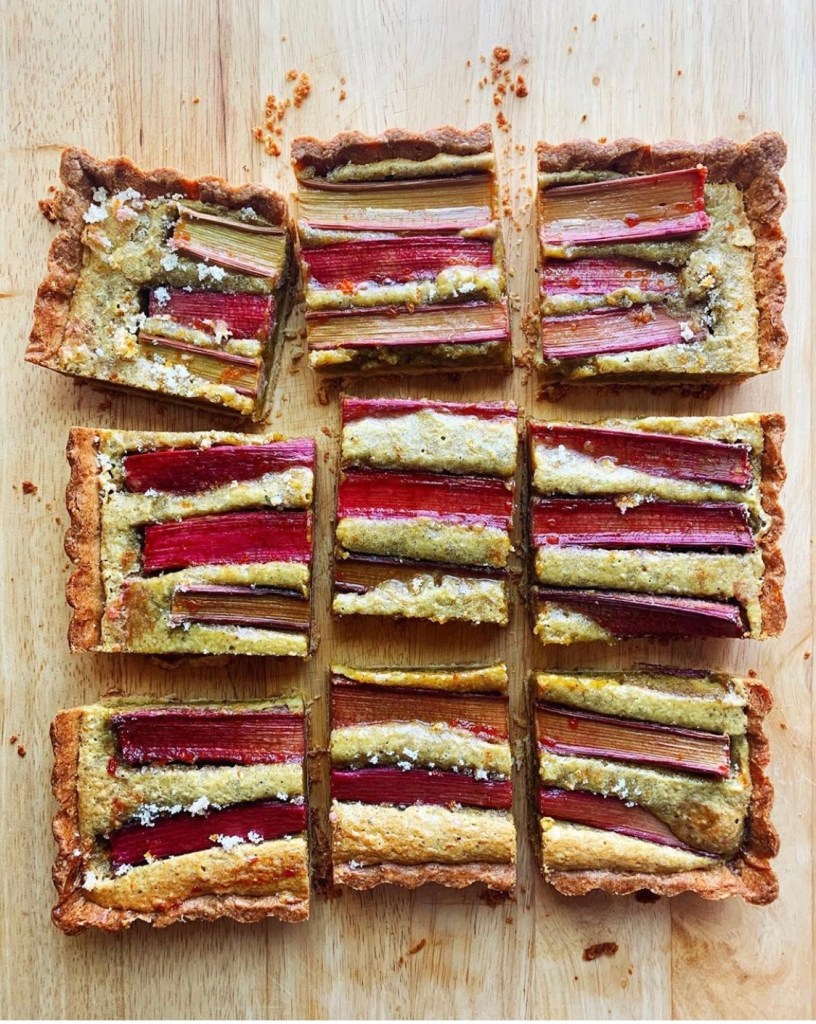
Was the result perfect? Absolutely not! Didn’t you just read most of this was an absolute first for me! But was it delicious? Heck yes it was.

You are absolutely going to need a scale to try to replicate this recipe (but let’s be honest we should all be using a scale when baking, right? Trial 101).
So I mostly used the recipe below, omit everything related to the strawberries. As stated earlier I used some technique from the Bon Appetit Rhubarb Galette recipe, which I will get to in a second. But back to the recipe below… I used vanilla bean paste for the crust instead of a vanilla bean pod (I’m not that fancy). I didn’t measure but I would say 1/2 – 1 teaspoon of the bean paste. Icing sugar is powdered sugar. For the ground almonds I used almond flour. I added two pinches of salt.
Now, it calls for very cold butter, so I pulled out frozen butter. I believe this was TOO cold of butter for the dough to come together. Just pull your butter from the fridge. I had to add 4 tablespoons of ice water for this reason, which did ultimately shrink the edges of my tart crust as The Boy Who Bakes warned of in the tart crust recipe video. It also took closer to 40 minutes for my blind bake to actually bake, instead of the 20-25 minutes stated in the recipe.
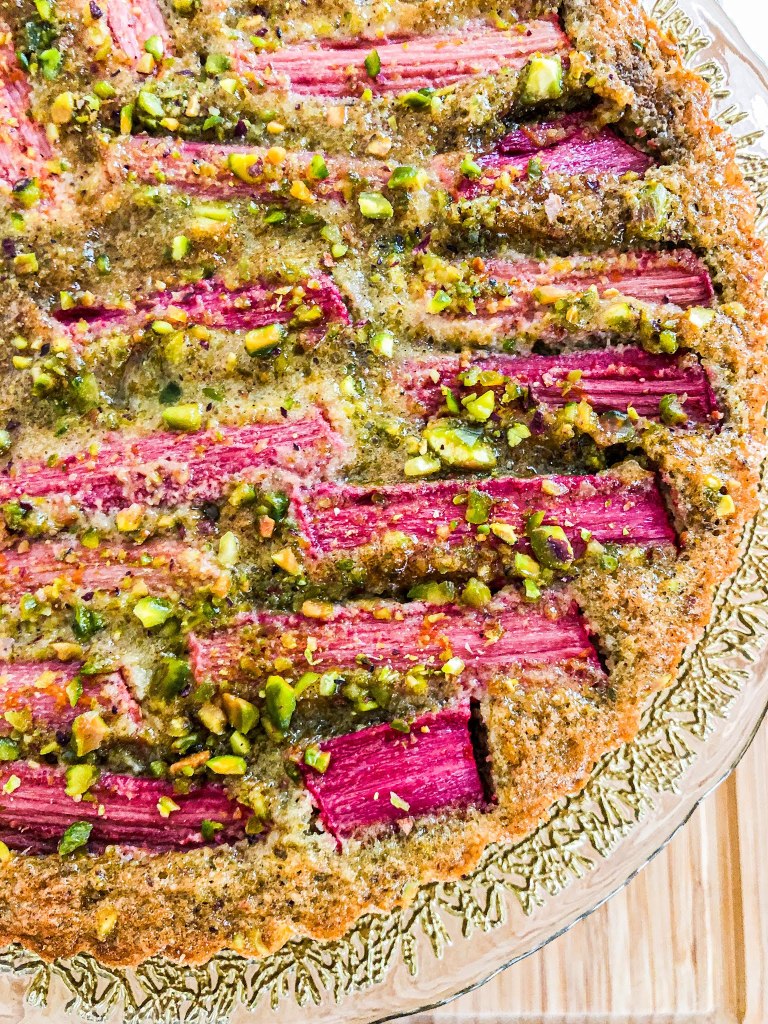
For the frangipane, I followed the recipe but I ground up a few more pistachios over almond, because hello it’s a pistachio frangipane (but this might be why it took so long to never fully bake).
For the rhubarb, I chopped it into smaller pieces and tossed it with zest of an orange, the orange juice, and some sugar to macerate it a little (hello bon appetit technique).
25 minutes after the frangipane and rhubarb had been baking in the tart crust, the filling was still wobbly, but was browning quickly on top. I didn’t know if this was normal, and read online that during the overnight cooling process it would set. So, all this to say, I don’t believe I actually baked it all the way through.
After all of this, the tart was still absolutely delicious and I hope Sarah creates an actual recipe for it someday.
STRAWBERRY AND PISTACHIO FRANGIPANE TART
INGREDIENTS
Sweet Pastry
400g plain flour
1 vanilla bean pod (optional)
35g ground almonds
75g icing sugar
pinch of salt
250g unsalted butter, chilled and diced
2 large egg yolks
about 1 tbsp ice cold water
Pistachio Frangipane
110g unsalted butter
110g caster sugar
zest of 1/2 lemon
1 tsp vanilla bean paste
2 large eggs
70g ground almonds
40g pistachios, finely ground
1 tbsp plain flour
1/2 tsp baking powder
Topping
400g strawberries
1-2 tbsp caster sugar
INSTRUCTIONS
Cut the vanilla pod, if using, in half and scrape out the seeds. Put the seeds in the bowl of a food processor, add the flour, almonds, icing sugar and salt, and pulse to combine. Add the butter and pulse until the mixture resembles breadcrumbs. Add the egg yolks and water and pulse until fully combined. (Alternatively, put the flour, almonds, icing sugar, salt and vanilla in a large bowl and mix to combine. Add the butter and rub together using your fingertips, or use a pastry cutter, until the mixture resembles breadcrumbs. Add the egg yolks and water and mix together until the dough just starts to come together.) Be careful not to over-process the dough, or the finished pastry will be tough and chewy, you only want to mix the dough until it starts to clump together, not until it forms a uniform dough.
Turn the dough out onto a lightly floured work surface and gently bring together with your hands, very gently kneading into a smooth, uniform dough. Divide into two pieces, pressing into flat rounds. Wrap the pastry in clingfilm and rest it in the fridge for at least 1 hour before using.
As with most pastry, this can be chilled and kept for up to one week before using, or it can be frozen for up to a months. This recipe is enough for two large tarts so you can either make a half batch or use one portion for another recipe.
Preheat the oven to 180C (160C fan). Take the disc of pastry out from the fridge and lightly flour the work surface with a little flour. Roll the pastry out until it is about 3mm thick. Roll back onto the rolling pin then gently unroll into a 9 inch loose bottomed tart tin. Gently lift up the excess pastry and press it into the corners of the tin, if you press the pastry in without lifting it up, you risk stretching or ripping the pastry and if it stretches its more prone to shrinkage.
Trim off the excess pastry and refrigerate the tart shell in the fridge until the pastry is firm. Line the tart with a crumpled piece of parchment paper and fill with rice. Bake in the preheated oven for about 25 minutes then remove the rice and parchment and bake for a further 5-10 minutes just until the top edge of the tart shell is browning and the base is set but with just a hint of colour. Remove from the oven and allow to cool then brush all over with a beaten egg yolk and bake a further minute or so until set, this will prevent the pastry from becoming soggy when we add the frangipane.
To make the frangipane place the butter, sugar and lemon zest into a large bowl and using an electric mixer beat together until light and fluffy, about 5 minutes. Beat in the eggs one at a time then mix together the dry goods and stir into the butter mixture, mixing until fully combined. Spread the frangipane inside the tart shell and sprinkle with a few extra chopped pistachios (optional). Bake in the preheated oven for about 25 minutes or until the frangipane is lightly browned and springs back to the touch. Remove from the oven and set aside to cool fully.
For the topping slice the stalk from the strawberries and cut in half, placing into a bowl. Sprinkle the sugar over the strawberries (if they are rally flavourful and sweet they will only need 1 tablespoons if they need a little extra boost in flavour use the full 2 tablespoons) and set aside for about 30 minutes to macerate, this will help boost the flavours and draw out some of the moisture which also looks great on the finished dish. To finish top the tart with the strawberries and sprinkle with a few chopped pistachios.
Once the tart is topped with the strawberries it is best the day served but you can make the tart a day or two in advance just doing the strawberries when ready to serve.
Let me know how the recipe turned out for you in the comments below!
