“…half of what we think we like about eating meat has absolutely nothing to do with meat, but the way it’s prepared, from the salt-pepper char on a steak to the layers of flavors in a long braise.”
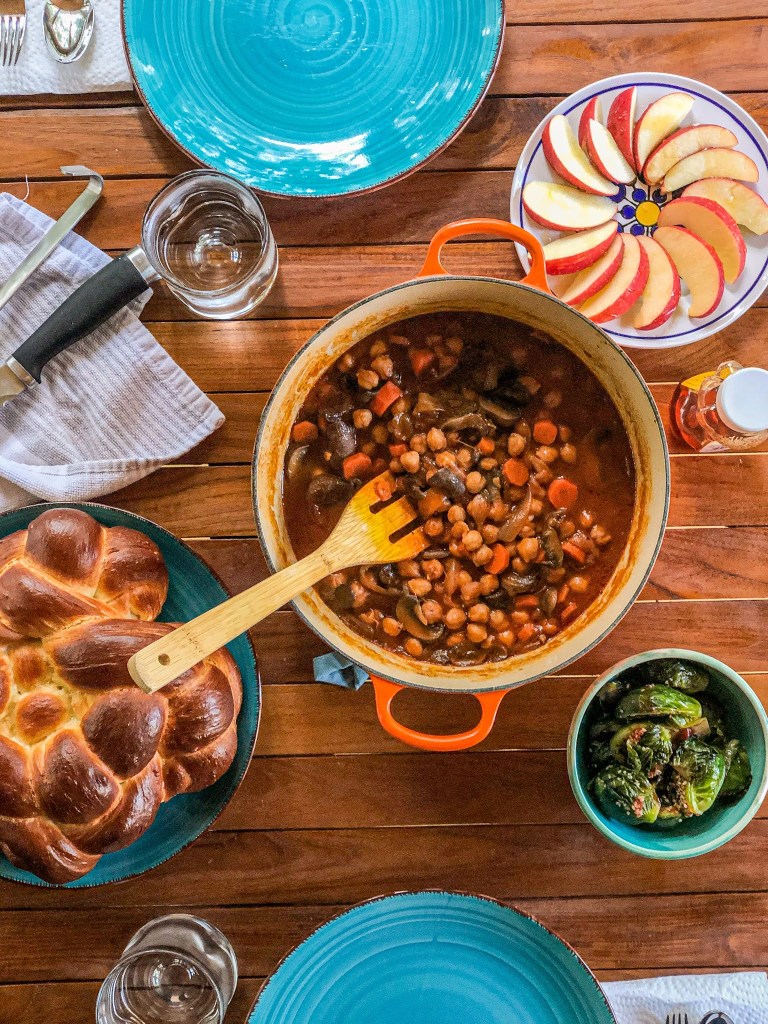
I made a full Rosh Hashanah meal for two this year (because covid), and was thrilled with the results! The spread included an apple with drizzled honey, a Challah loaf, siracha-honey roasted brussels sprouts and Smitten Kitchen’s Tangy Braised Chickpeas. Everything was irresistibly good, but the Tangy Braised Chickpea entrée STOLE. THE. SHOW. I’ve always been a fan of chickpeas, and I consider myself to be a flexitarian, so when I cam across this recipe I was immediately drawn to this dish. I couldn’t wait to make it for Rosh Hashanah.
So, here we go… see the results and recipe below.
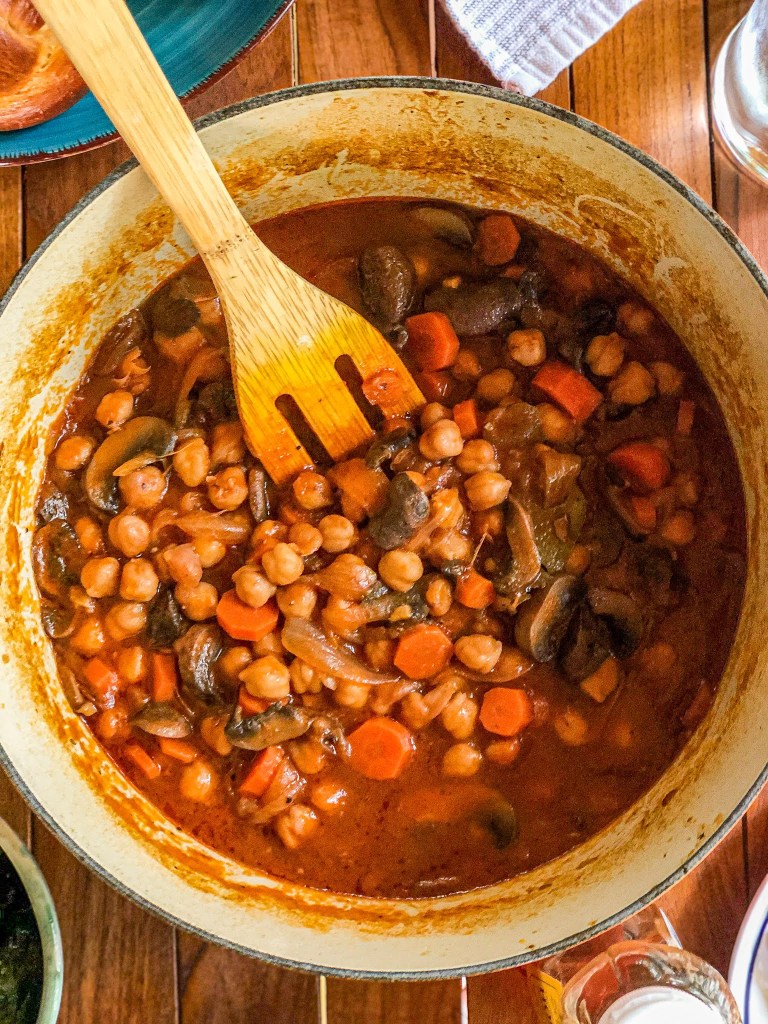
The recipe provided by Smitten Kitchen was simple and easy to follow. I followed the recipe exactly, with one minor change. I searched my cabinets high and low for my red wine vinegar, and couldn’t find it. So I grabbed some apple cider vinegar, a red wine blend, and combined the two to equal 1/3 cup. You won’t believe it, 30 minutes into the braise I found my red wine vinegar – hah!
An instructional change I made was seasoning the dish twice while in the oven. I pulled out the dutch oven, sprinkled salt and pepper, then put back into the oven (about 30 min apart).
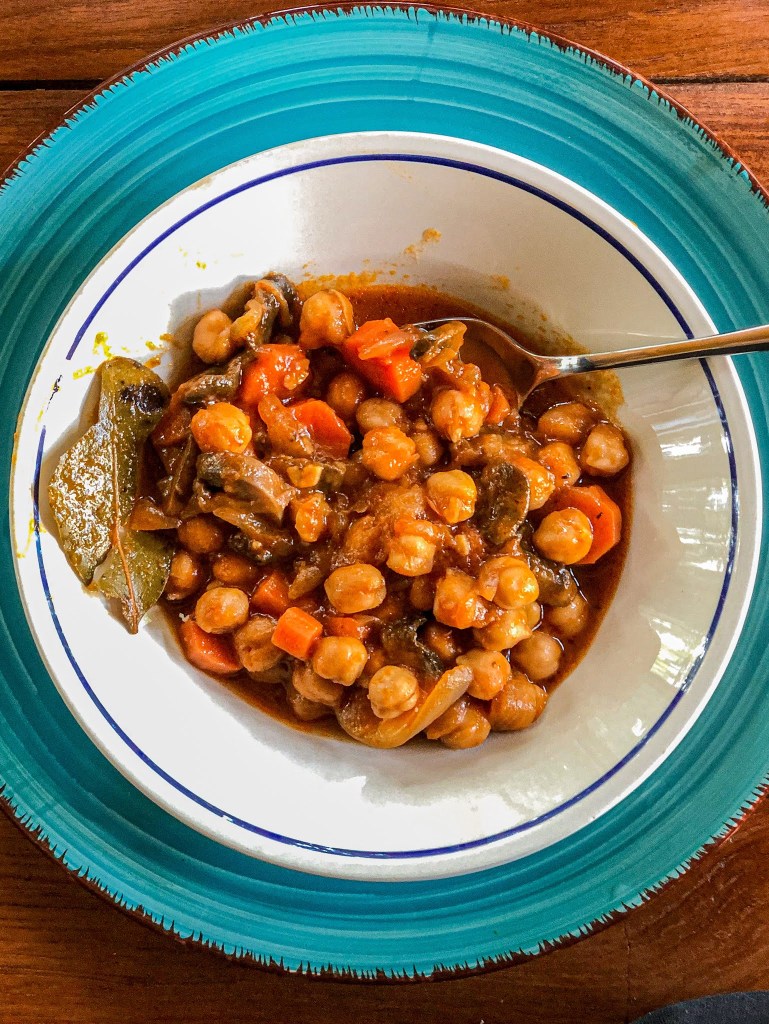
I can’t describe how delicious this dish is. All I can do is HIGHLY encourage you to make it so you can discover for yourself.
2 large, thick carrots (12 ounces), in 1/4-inch slices
Kosher salt
Freshly ground black pepper
1/4 teaspoon red pepper flakes
6 ounces or 2 large portobello mushrooms, in generous 1/2-inch slices
4 tablespoons tomato paste
1 1/2 tablespoons dark brown sugar
3 to 4 cups mushroom or vegetable stock
1/3 cup red wine vinegar or sherry vinegar
2 teaspoons Worcestershire or soy sauce
2 15-ounce cans chickpeas, drained and rinsed
1 bay leaf
INSTRUCTIONS
Heat oven to 350 degrees. If you have a Dutch oven or braiser that can go from stove to oven, start in this on the stove. If not, start with a wide, deep saute pan and transfer the mixture to a 3-quart (or 9×13-inch) casserole or baking dish for the oven part.
Heat 4 tablespoons olive oil over medium heat and add onion; cook 3 minutes, until softened. Add garlic and cook 2 minutes more. Add the carrots, 1 teaspoon salt, freshly ground black pepper, and red pepper flakes and cook for 2 more minutes, until they begin to glisten. Add the mushrooms and cook for 4 minutes, until they begin to soften. Add tomato paste and brown sugar and cook until well-incorporated, 3 minutes. Add 3 cups stock, vinegar, Worcestershire or soy sauce, chickpeas, and bay leaf and bring to a simmer with another teaspoon of kosher salt and more ground pepper.
Once simmering, either cover tightly with a lid or pour into your baking dish and cover with a lid or tightly with foil and transfer to oven. Braise chickpeas and vegetables for 90 minutes, checking at the 1 hour mark to make sure the chickpeas haven’t absorbed all of the broth (and adding the remaining 1 cup broth if so). Remove from oven, discard bay leaf, and adjust seasonings to taste.
Do ahead: Braised chickpeas will keep in the fridge for 4 days, and for a month or longer in the freezer. Reheat at 350 degrees.
It’s time to eat, enjoy!
Let me know how the recipe turned out for you in the comments below!
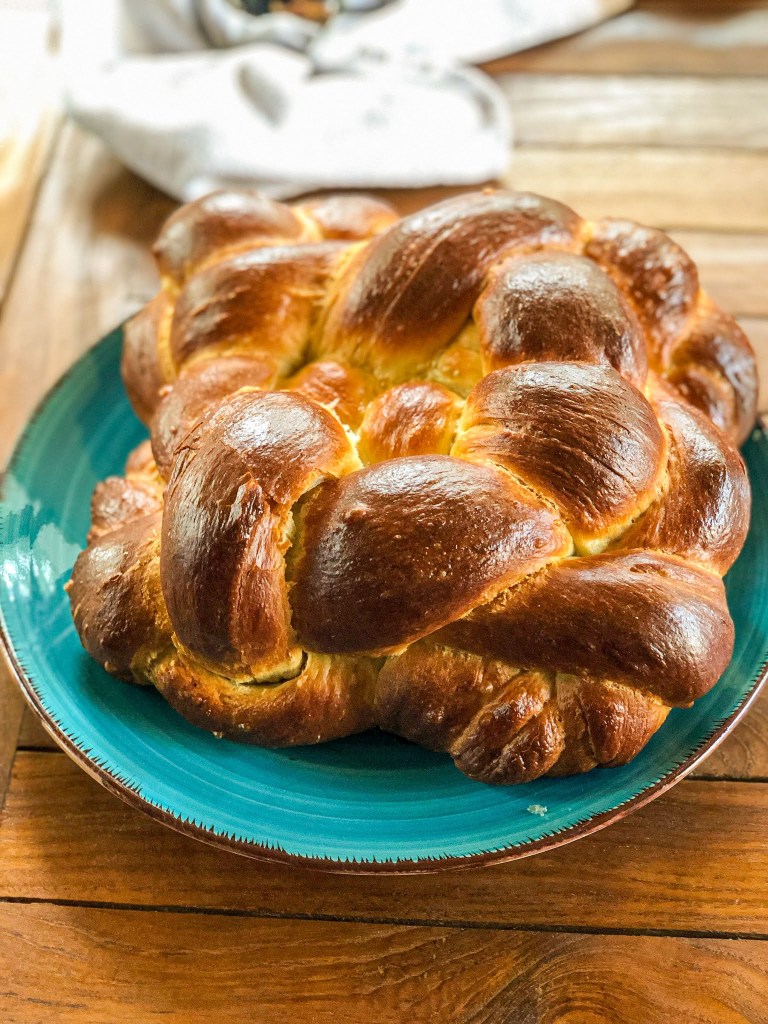
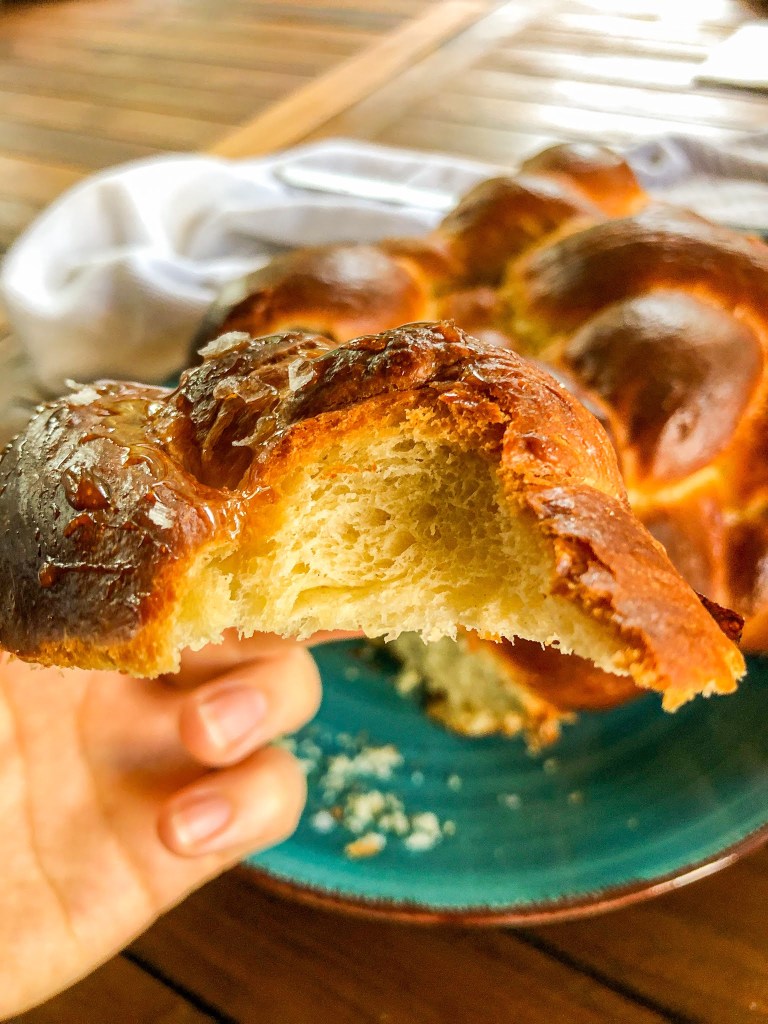
“Nothing compares to freshly baked challah bread, and this one’s the best loaf I have made so far. For those of you intimidated by baking or challah making beginners, let me tell you, I spent several days testing and perfecting this recipe. I can assure you that this recipe is guaranteed to give you a full stomach and happy heart, if you follow all the steps.”
I decided to make a Challah loaf this September for Rosh Hashanah because I’ve always wanted to, and what better time than the present day quarantine reality! I did a lot of research before making this bread. A passive two weeks worth of research. I discovered different posts that discussed the best sheen results (egg was, vs aquafaba, vs honey and more [the egg wash looked the best, trust me]). I discovered it is important to get the first and second egg wash in all of the nooks and crannies to insure there is maximum color is added to the loaf. I also discovered it doesn’t matter if you use all-purpose or bread flour! After making this bread and being so successful the first time, I can promise you that you will be too. Just follow the recipe and you’ll knock it out of the park.
See below for some things to note when making this bread.
I consulted two different recipes to make this loaf a reality. I knew I wanted to use honey instead of sugar, and I also knew I wanted to use olive oil instead of vegetable oil. I didn’t find any recipes that used both of these ingredients as most called for granulated sugar and vegetable oil. I wanted to use Melissa Clark’s Olive Oil Challah but didn’t have any oranges, so I followed Carolina Gelen’s recipe. When comparing the recipes they are not that different. So I forged my own path.
I followed all of the weighted measurements of Carolina Gelen’s recipe except swapped the sugar for honey and vegetable oil for olive oil. I kept the weights the same as is called for in the recipe.
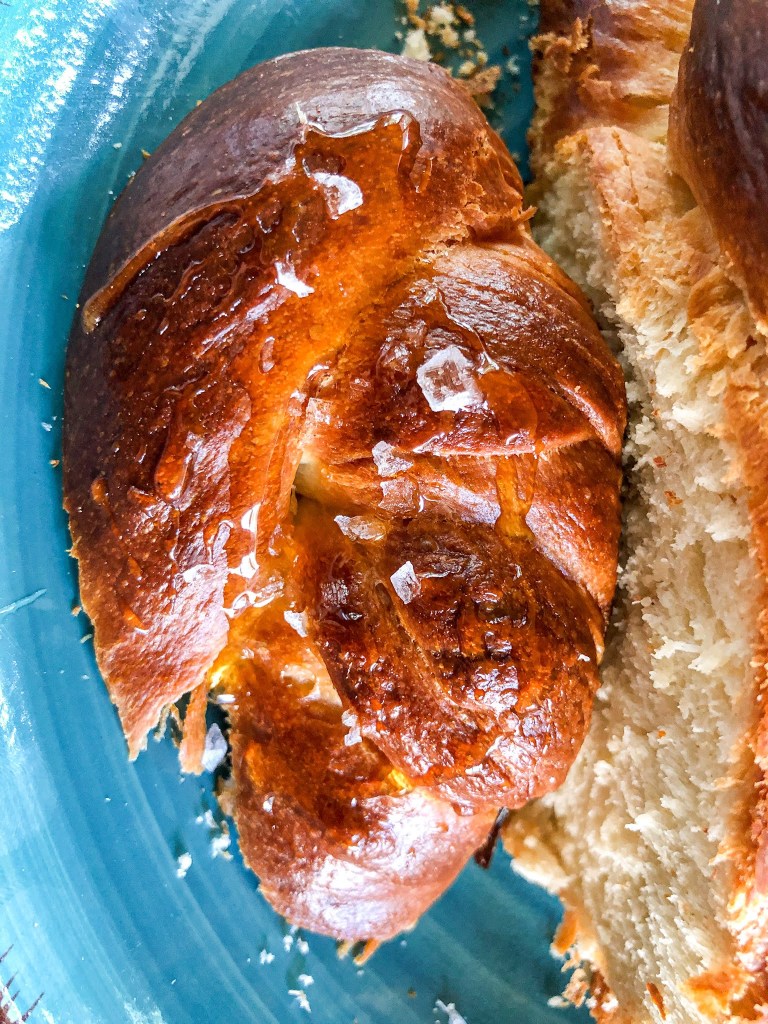
In my research for baking Challah, I came across a technique most chef’s were doing and that was a double egg wash. Once I finished braiding the dough, I carefully added an egg wash. Then I let the braided dough rise for 30 minutes, and before placing in the oven, added the second egg wash. The only thing to note is that I attempted to test if the dough was done proving by making an indent, but the first egg wash became so sticky that I could never get the indent to happen.
Melissa Clark’s recipe called for the bread to be baked at 375 for 25-35 minutes. I did bake it at 375 and had to leave it in closer to the 35 minute mark. To determine if the loaf was done baking, I temp checked for 209 degrees as well as tapped to see if it made a hollow sound. Both happened!
Enjoy!
Carolina Gelen put honey and sea salt on top of her Challah, so I did as well.
20-25 grams fresh yeast or 7 grams active dry / instant yeast
125 grams lukewarm water
50 grams sugar (I used honey)
70 grams neutral oil (I used olive oil)
such as sunflower seed oil, grape seed oil, vegetable oil, canola oil, etc.
3 eggs
2 whole eggs
1 separated egg
1 egg yolk for the dough
1 egg white for our egg wash
10 grams salt
500 grams bread or all purpose flour (I used bread flour)
INSTRUCTIONS
In a bowl, mix the yeast, lukewarm water and sugar together until the yeast has dissolved.
Note: If you are using dry yeast, make sure it is still active by letting it sit in the water for 5 minutes once mixed. If the mixture becomes slightly foamy, it’s active, otherwise, try another sachet of yeast.
Next, add the oil, 2 whole eggs and 1 egg yolk to the bowl and mix until the sugar has dissolved and everything is well incorporated.
Add the flour and salt to the liquid batter and mix until the flour has fully hydrated (until there are no visible dry spots). If your dough still feels a bit too dry and hard to knead, don’t be afraid of adding a couple more tablespoons of water to it. The hydration of the dough depends on the size of the eggs you are using and other external variables like the environment you are in and the humidity of the air. Therefore, trust your gut, add some more water if necessary and start kneading! You will see that the dough will start to clean the sides of the bowl while you mix it.
Once everything is incorporated, it’s time to knead our dough, this will encourage the gluten development in our dough which will give structure to our challah loaf.
It took may take about 5-7 minutes of kneading by hand to get to the perfectly smooth dough texture.
If you are adding any other ingredients like raisins, chocolate chips or nuts, now is the time to add them to the dough and incorporate them as well. No need for them to participate in the whole kneading process, just add them once you are done kneading the dough.
Shape the dough into a ball and place it in a lightly greased bowl.
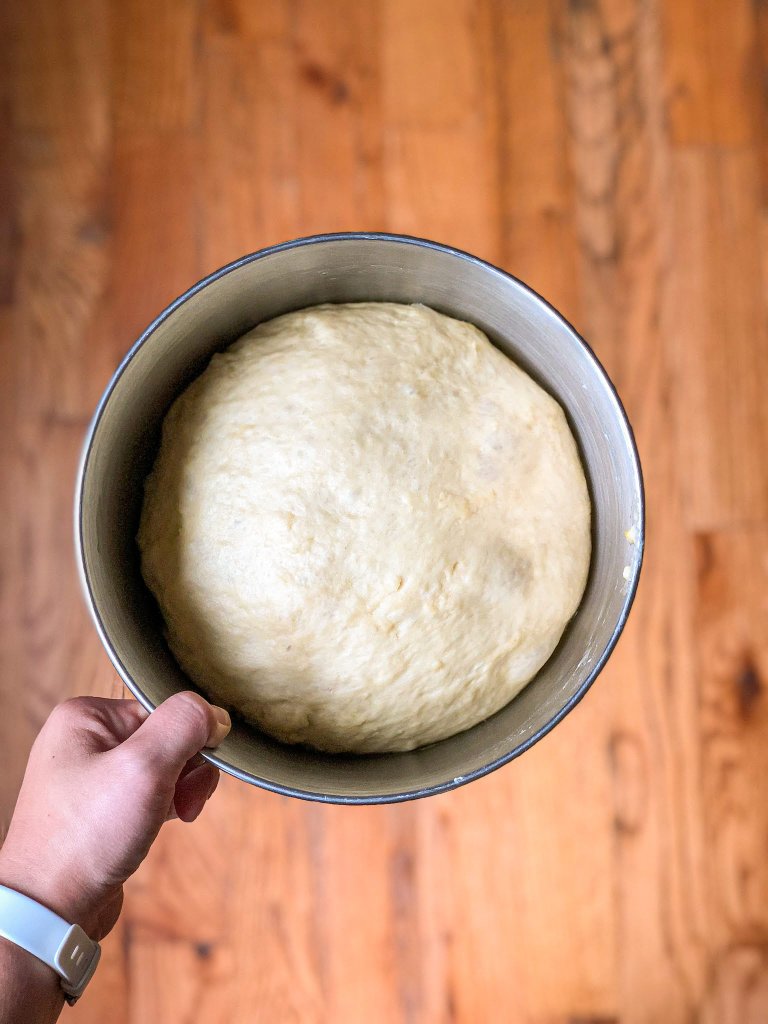
Cover the bowl and let the dough rest and proof for about 1 hour at 26°C (78°F) – it will take less or more time depending on the temperature of the room. The dough should feel light, airy and it should have doubled in size.
Do not rush this step, if you underproof your dough, the challah will come out dense and chewy.
Once the dough is done proofing (once it has doubled in size), take it out, place it on a wooden board or directly on the table and flatten it out.
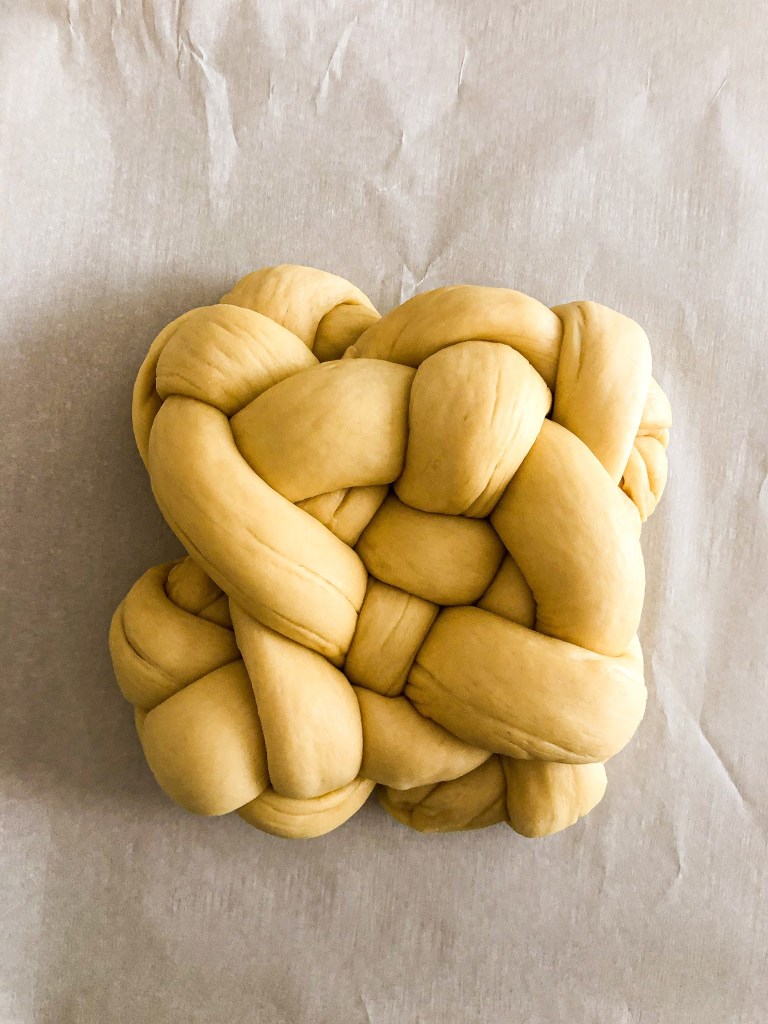
After that, divide the dough into how ever many strands you would like to braid it in – 3, 4, 5, 6, 7, etc. You can eyeball the division of the dough or weigh the whole dough first, and then weigh each piece of dough to make sure they are all equal in weight.
Next, shape each piece of dough as shown in the photos down below, this will ensure an even, smooth, less crusty finish of the dough. Grease your hands or the surface you are working on with some more oil if necessary.
Roll out each individual piece of dough into a strand.
Pinch all the strands of dough together and braid as you please. Try to keep the braiding a bit loose to allow the dough to rise without bursting and snapping once it is in the oven, baking.
Keep in mind you will want to preheat your oven at 200°C (390°F) 7-10 minutes before adding your loaf in.
Place your dough onto a flat baking tray lined with parchment paper or into a loaf tin and cover the dough with a clean towel or saran wrap.
Allow the dough to rise again for 20-30 minutes at 26°C (78°F) – again, it will take less or more time depending on the temperature of the room. Again, do not rush the process, the dough needs time to rise and become light and airy after we worked it out once again.
You will know the dough is done proofing when once you gently poke the dough with your finger, it will leave an indent and not spring back.
You can absolutely use a regular egg wash – a whole egg plus a tablespoon of water. I preferred to use the leftover egg white as my egg wash, as you usually use 1/4 of the egg wash you’d make anyways.
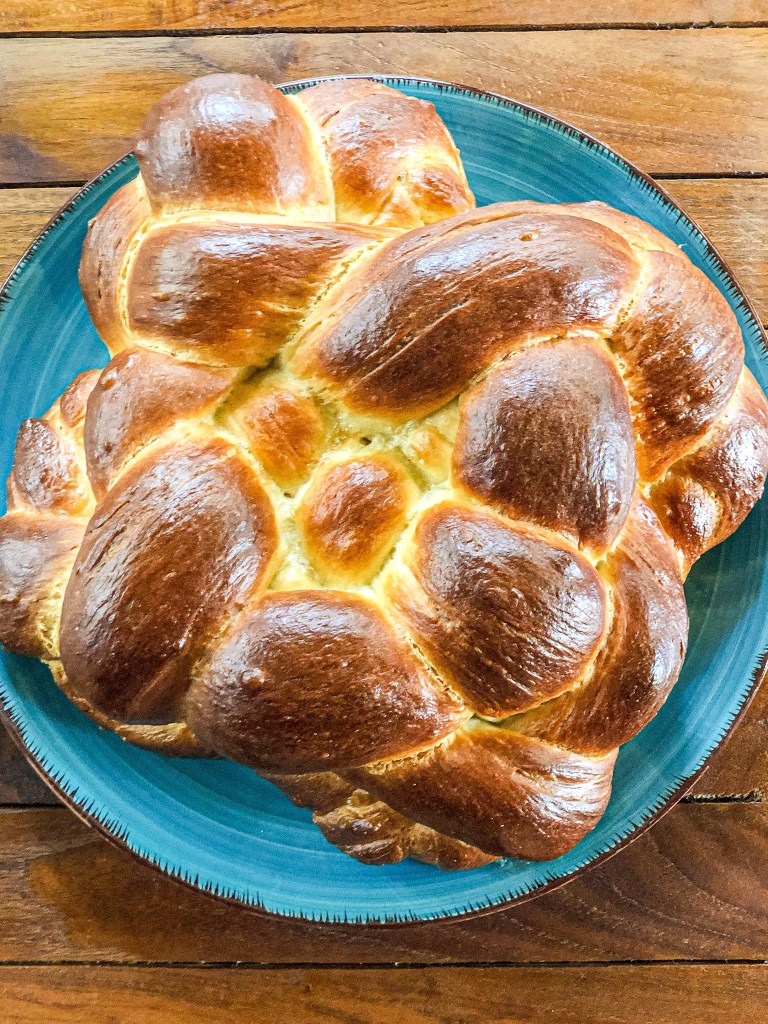
Lightly brush the egg white on top of the challah before adding the dough into the oven if you like a deeper, darker colour. If you are topping the challah with any seeds or nuts or salt, now is the time to sprinkle it on top of the loaf, once the egg wash is on.
Pop the challah loaf in the oven for 25-30 minutes, until golden, amber brown.
Note: Try to keep an eye on the challah loaf, once it is in the oven. You know your oven the best, so you will probably anticipate its behavior in this scenario. For example, I know my oven tends to burn the right side of the loaf, so half way through the baking process, I pull out the challah and turn it 180° so the other side will bake evenly as well.
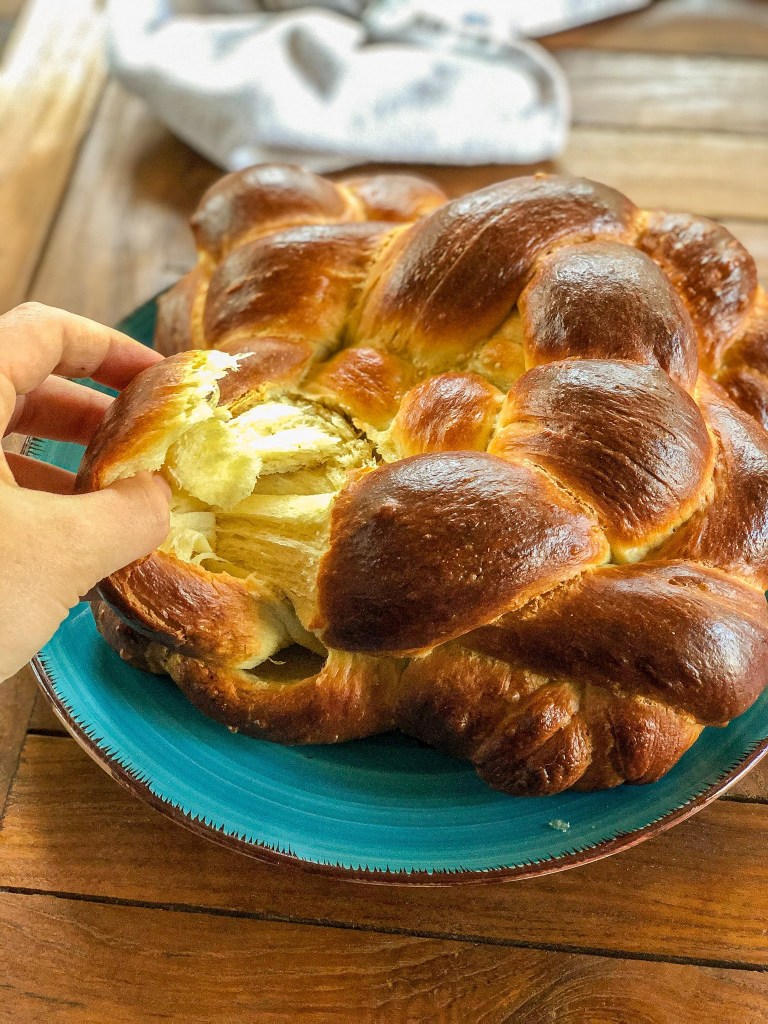
It’s time to eat, enjoy!
Let me know how the recipe turned out for you in the comments below!
“If you want to fill your kitchen with the smell of fresh-baked bread but you’re nervous about shaping a boule or working with a starter, focaccia is the best place to begin.”
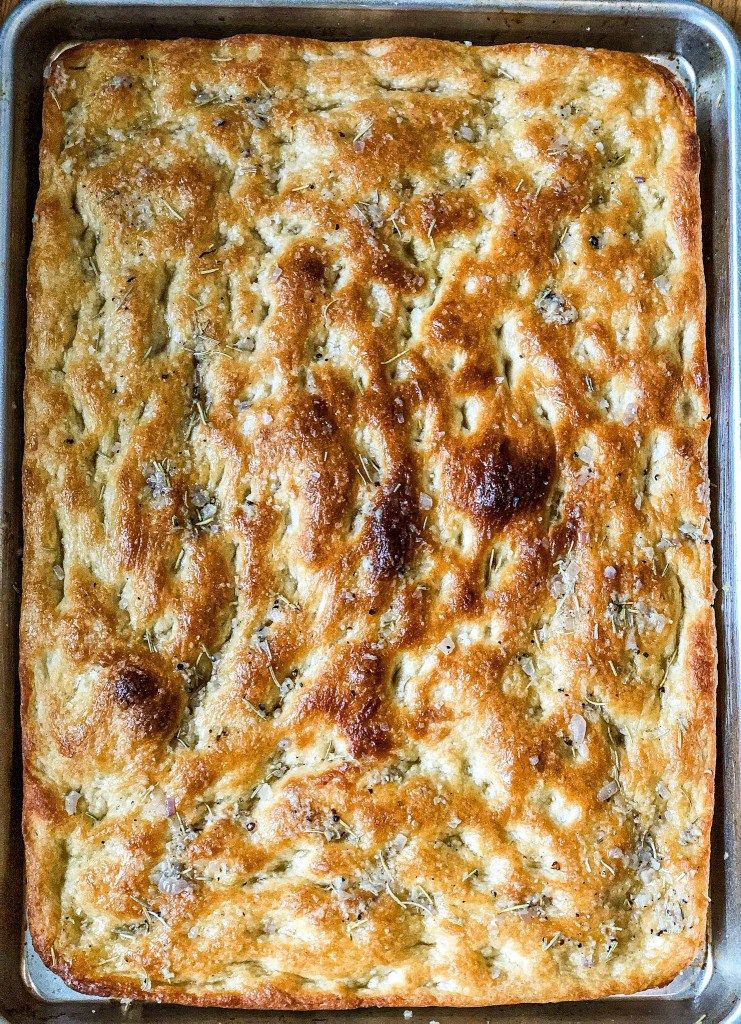
Basically’s Better Baking Challenge started around February and was a 10 week challenge that went through the beginning of quarantine. The idea of making an entire loaf of focaccia for just myself and my husband seemed silly (Now I know I could’ve frozen half for later). I finally found an excuse to make focaccia for a night at a friends house to add to a full cheese and snack board (don’t worry there were only 7 of us). Anyway, the bread was insanely easy to make, absolutely delicious, and I hope everyone tries it out at least once!
See below for some things to note when making this bread.
Shelby’s focaccia from baby dough to full grown bread.
First of all, I recommend heading over to Basically’s instagram account, and watch the “BB: Focaccia” video to see how Sarah explains the recipe.
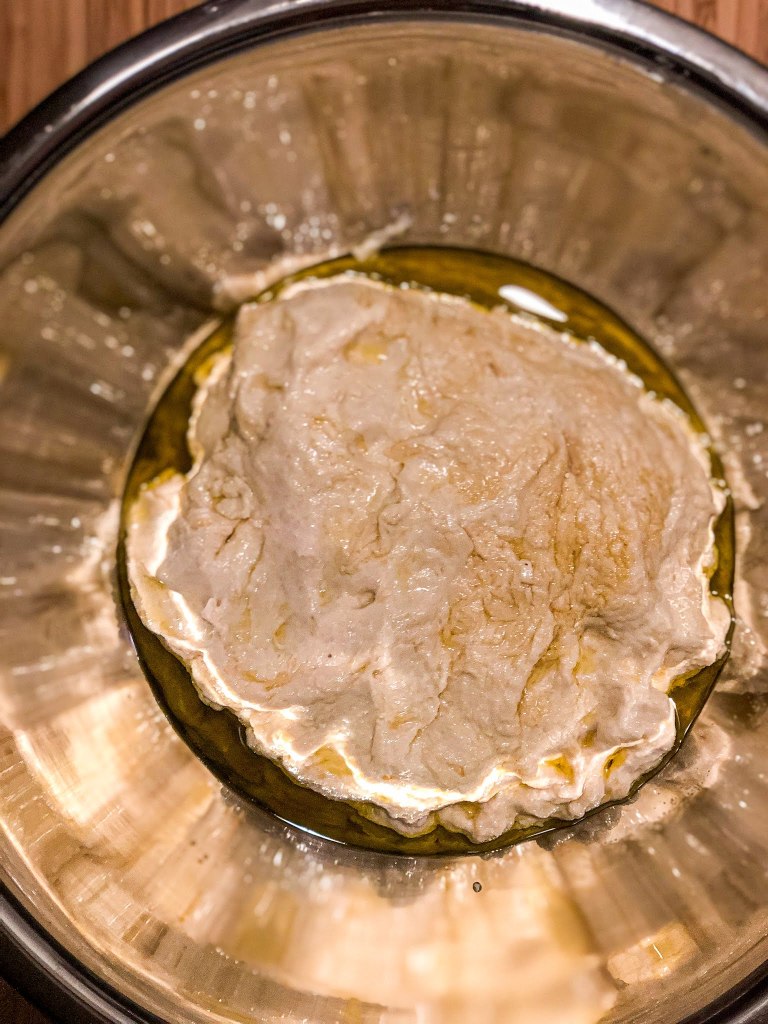
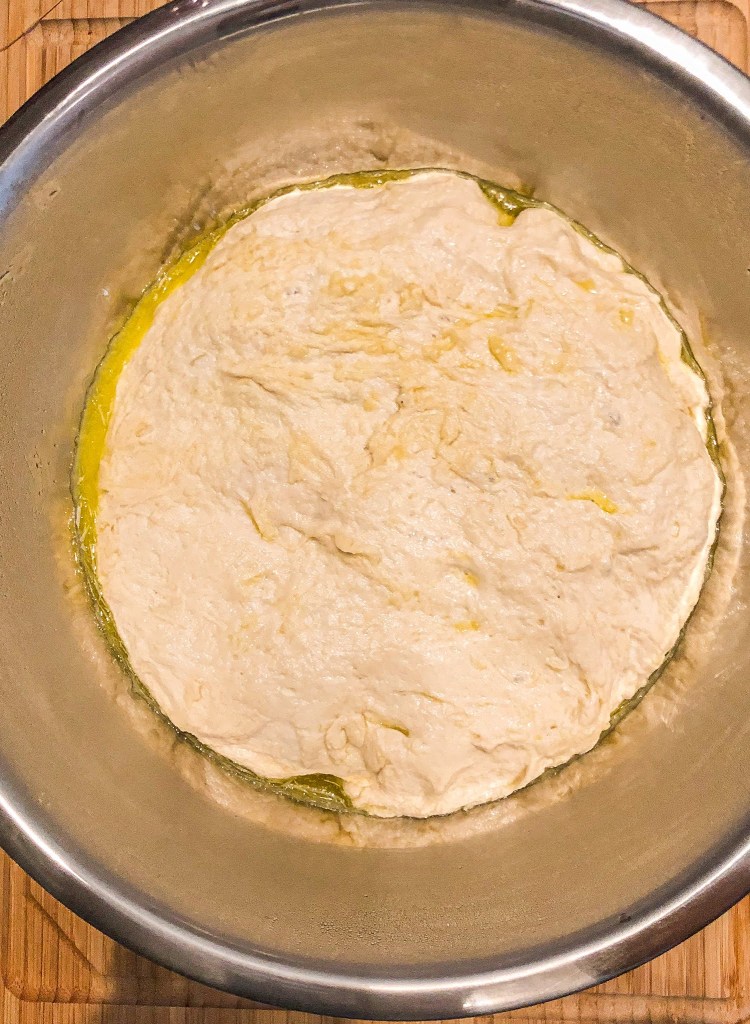
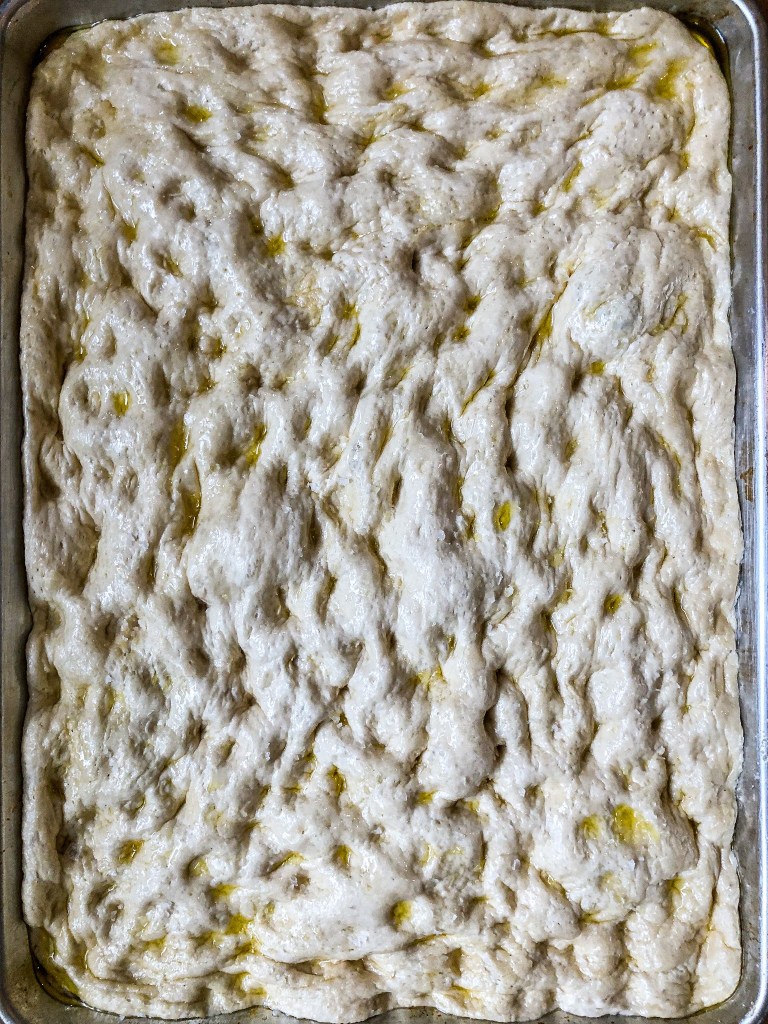
Once I made the dough, I let it rise for 15 hours. The dough had definitely risen a lot, but potentially could’ve risen more if it rested for the full 24 hours. I scraped the dough out of the bowl onto my buttered/oiled sheet pan still in the shape of a dough ball on the pan as I didn’t want to disturb the dough too much. After two hours of a second rise, the dough had not spread out very well in the pan. So, I pushed my fingers throughout the dough to stretch it as close to the full length of the pan as I could. I then let the dough set again for two hours in the oven with the light on. It had finally expanded throughout the entire pan and was fairly jiggly.
I believe the reason the dough hadn’t spread very much was because it was still very cold from rising in the fridge. All this to say, provide extra time for the dough to rise fully (24-36 hours) in the fridge, and pre-spread the dough out on a baking sheet if not using the 13×9 pan to let it completely “defrost.”
Otherwise, follow all of the directions Sarah Jampel provided in the recipe linked and pasted below.
5 tsp. Diamond Crystal or 1 Tbsp. Morton kosher salt
6 Tbsp. extra-virgin olive oil, divided, plus more for hands
4 Tbsp. unsalted butter, plus more for pan
Flaky sea salt
2–4 garlic cloves
INSTRUCTIONS
Whisk one ¼-oz. envelope active dry yeast (about 2¼ tsp.), 2 tsp. honey, and 2½ cups lukewarm water in a medium bowl and let sit 5 minutes (it should foam or at least get creamy; if it doesn’t your yeast is dead and you should start again—check the expiration date!).
Add 5 cups (625 g) all-purpose flour and 5 tsp. Diamond Crystal or 1 Tbsp. Morton kosher salt and mix with a rubber spatula until a shaggy dough forms and no dry streaks remain.
Pour 4 Tbsp. extra-virgin olive oil into a big bowl that will fit in your refrigerator. This puppy is going to rise! Transfer dough to bowl and turn to coat in oil. Cover with a silicone lid or plastic wrap and chill until dough is doubled in size (it should look very bubbly and alive), at least 8 hours and up to 1 day. If you’re in a rush, you can also let it rise at room temperature until doubled in size, 3–4 hours.
Generously butter a 13×9″ baking pan, for thicker focaccia that’s perfect for sandwiches, or an 18×13″ rimmed baking sheet, for focaccia that’s thinner, crispier, and great for snacking. The butter may seem superfluous, but it’ll ensure that your focaccia doesn’t stick. Pour 1 Tbsp. extra-virgin olive oil into center of pan. Keeping the dough in the bowl and using a fork in each hand, gather up edges of dough farthest from you and lift up and over into center of bowl. Give the bowl a quarter turn and repeat process. Do this 2 more times; you want to deflate dough while you form it into a rough ball. (We learned this technique from Alexandra Stafford, who uses it to shape her no-knead bread.) Transfer dough to prepared pan. Pour any oil left in bowl over and turn dough to coat it in oil. Let rise, uncovered, in a dry, warm spot (like near a radiator or on top of the fridge or a preheating oven) until doubled in size, at least 1½ hours and up to 4 hours.
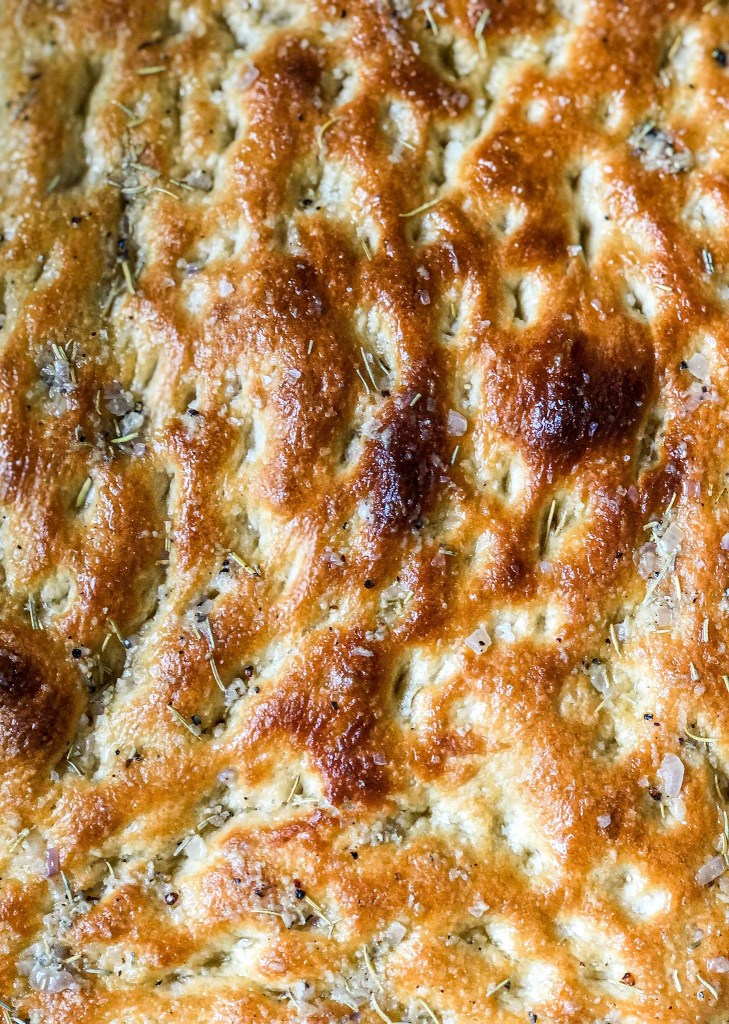
Place a rack in middle of oven; preheat to 450°. To see if the dough is ready, poke it with your finger. It should spring back slowly, leaving a small visible indentation. If it springs back quickly, the dough isn’t ready. (If at this point the dough is ready to bake but you aren’t, you can chill it up to 1 hour.) Lightly oil your hands. If using a rimmed baking sheet, gently stretch out dough to fill (you probably won’t need to do this if using a baking pan). Dimple focaccia all over with your fingers, like you’re aggressively playing the piano, creating very deep depressions in the dough (reach your fingers all the way to the bottom of the pan). Drizzle with remaining 1 Tbsp. extra-virgin olive oil and sprinkle with flaky sea salt. Bake focaccia until puffed and golden brown all over, 20–30 minutes.
Hold off on this last step until you’re ready to serve the focaccia: Melt 4 Tbsp. unsalted butter in a small saucepan over medium heat. Remove from heat. Peel and grate in 2–4 garlic cloves with a Microplane (use 2 cloves if you’re garlic-shy or up to 4 if you love it). Return to medium heat and cook, stirring often, until garlic is just lightly toasted, 30–45 seconds. (Or, if you prefer raw garlic to toasted garlic, you can grate the garlic into the hot butter, off heat, then brush right away.)
Brush garlic-butter all over focaccia and slice into squares or rectangles.
Do Ahead: Focaccia is best eaten the day it’s made, but keeps well in the freezer. Slice it into pieces, store it in a freezer-safe container, then reheat it on a baking sheet in a 300° F oven.
It’s time to eat, enjoy!
Let me know how the recipe turned out for you in the comments below!
“I needed a healthy-ish anti-inflammatory Mex-Mex dish, and this is it.”
– Shelby
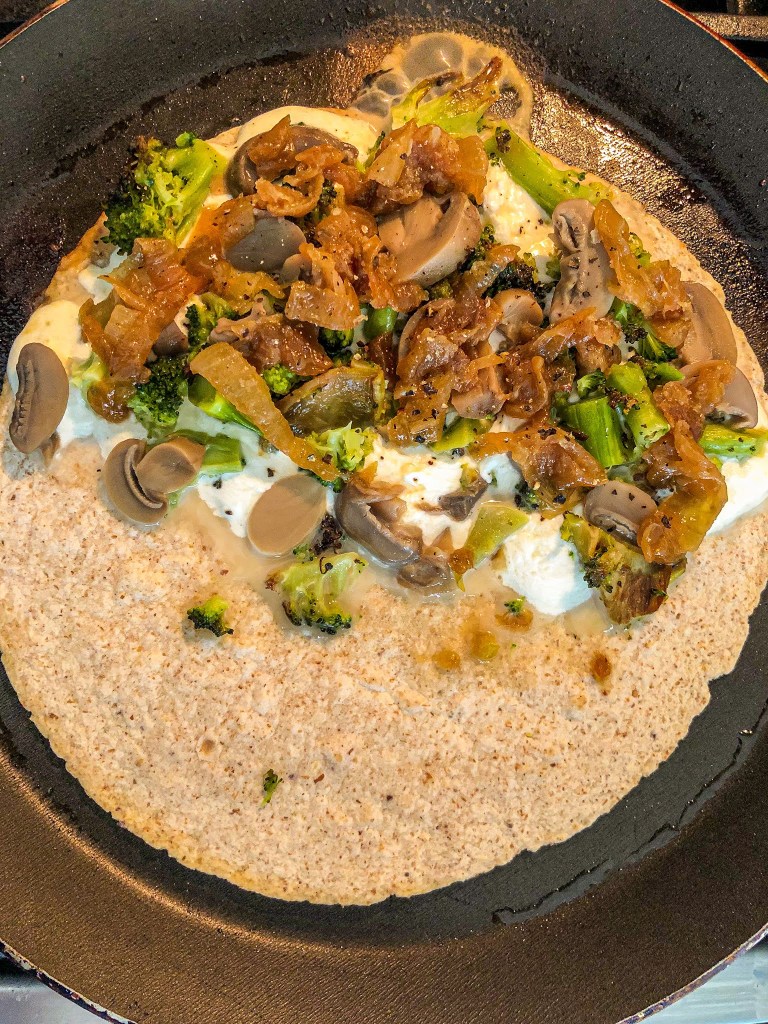
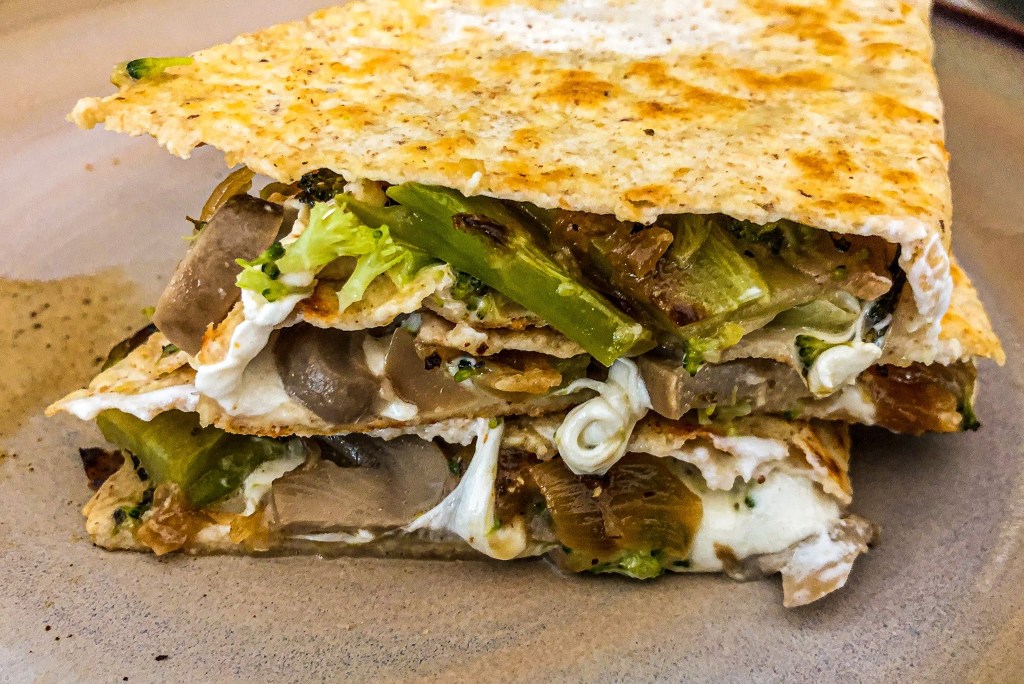
Shelby’s Broccolion & Moz Quesadilla.
I will start this post with some honesty that I don’t normally discuss, and that is that I have IC (Interstitial Cystitis). While having IC is nothing to be ashamed of, it is not something I enjoy talking about. IC is the source of why I can’t do a lot of things other people can, it is something that causes me deep physical pain regularly, and it is also something that prohibits me from eating a lot of foods I like (i.e. tomatoes).
So, I recently started seeing a new doctor who told me I absolutely must go on an anti-inflammatory diet for the next six weeks. Well, my most important food group in life is mex-mex cuisine, which uses a lot of acidic fruits, veggies, and spices. My mission: I needed a healthy-ish anti-inflammatory Mex-Mex dish, and this is it. The idea sparked from someone on Instagram sharing an anti-inflammatory broccoli and mozzarella quesadilla. It looked fine, but kind of boring, so I used that inspiration to create my new favorite lunch: the Broccolion & Moz Quesadilla.
Did I combine broccoli and onion into a word? Yes I did.
Shelby’s Broccolion & Moz Quesadilla.
I highly recommend buying good quality burrata/mozzarella over the shredded mozzarella from your grocery store. I believe the cheese quality will make or break the flavor and texture of this quesadilla. (For this recipe I used Biazzo fresh mozzarella balls in water)
Sweet onions are a must for this recipe. I prefer Vidalia onions over all of the sweet onions on the market, but when Vidalias are not in season, just make sure you grab sweet onions over yellow/white onions.
I made this recipe using fresh broccoli. Give it a go with frozen if you like. I find frozen broccoli never really has a bite to it and remains mushy no matter how it is reheated.
Mushrooms, I used canned, but by all means saute some fresh mushrooms in butter and garlic until tender, and I bet this recipe will hit the extra mile.
Broccolion & Moz Quesadilla
INGREDIENTS
1 sweet (Vidalia) onion, sliced
1 tablespoon of unsalted butter
1 head of fresh broccoli
Extreme Wellness Whole Wheat Wraps
Mozzarella or Burrata cheese
4 oz can of mushrooms/4 oz of fresh portabella mushrooms
Olive oil
Salt
Pepper
INSTRUCTIONS
(This recipe will make 4-5 quesadillas)
Start this recipe by caramelizing onions as these will take a while. I used the Bon Appetit guide to caramelizing onions (1/2 a recipe).
While the onions are caramelizing, slice the head of broccoli into “steaks.” Keeping the stalk on, attempt to get as many flat slices of the head of broccoli as you can, but don’t worry if your end pieces are still tree-like/bulky.
Using a skillet, add enough olive oil to coat the bottom of the pan, and turn up to medium heat. Once the pan is heating up, add the broccoli slices around the pan, then scatter a pinch of salt on top of the broccoli. Once the first side of the broccoli slice has browned, flip over all of the pieces and then place a lid over the top to help the broccoli soften a bit. To know when the broccoli is done, it should be roasty toasty but not burnt.
Remove broccoli from the skillet to a cutting board to let cool down, and return skillet to the stove top. Once broccoli has cooled enough, give it a rough chop to bite size pieces.
Once the onions are caramelized, it’s time to assemble! Heat a skillet to medium heat, and pour a small amount of olive oil in the pan (this is to brown the tortilla wrap). Add the wrap to the pan, followed by strips of mozzarella. Next, top the cheese with the broccoli, mushrooms, and onion. Add a few cracks of pepper and let heat up until the wrap is getting browned on bottom. Then fold over, leave on the heat for 1-2 more minutes, and remove from skillet.
It’s time to eat, enjoy!
Let me know how the recipe turned out for you in the comments below!
“We all need some healthy-ish comfort food these days.”
– Shelby
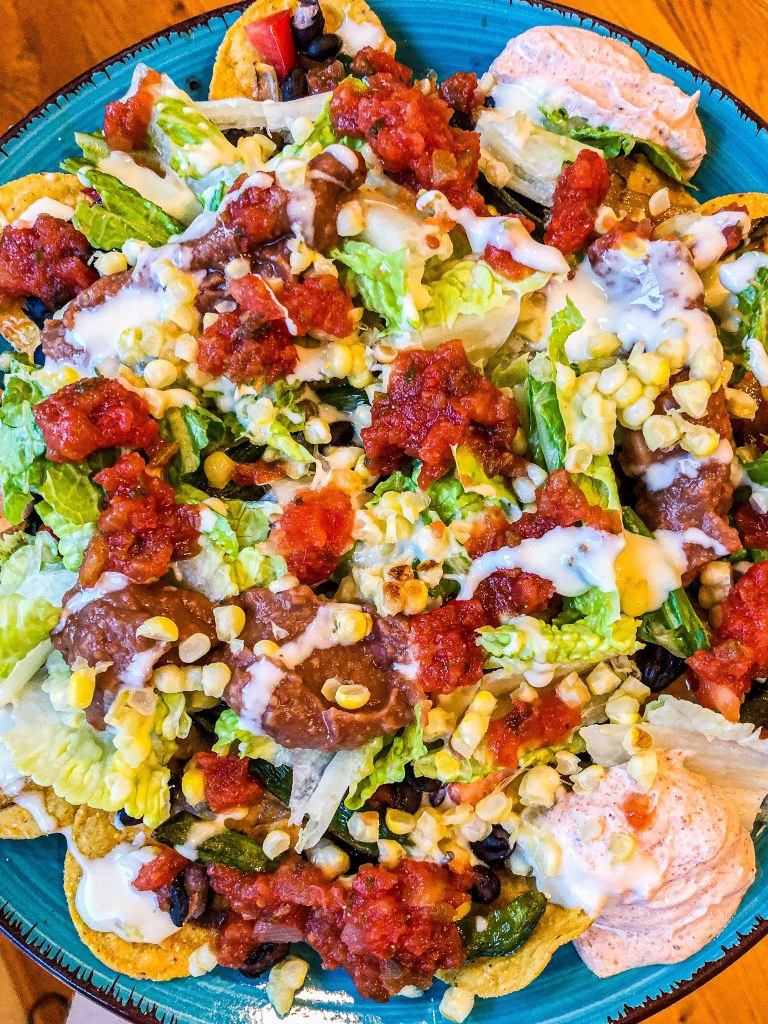
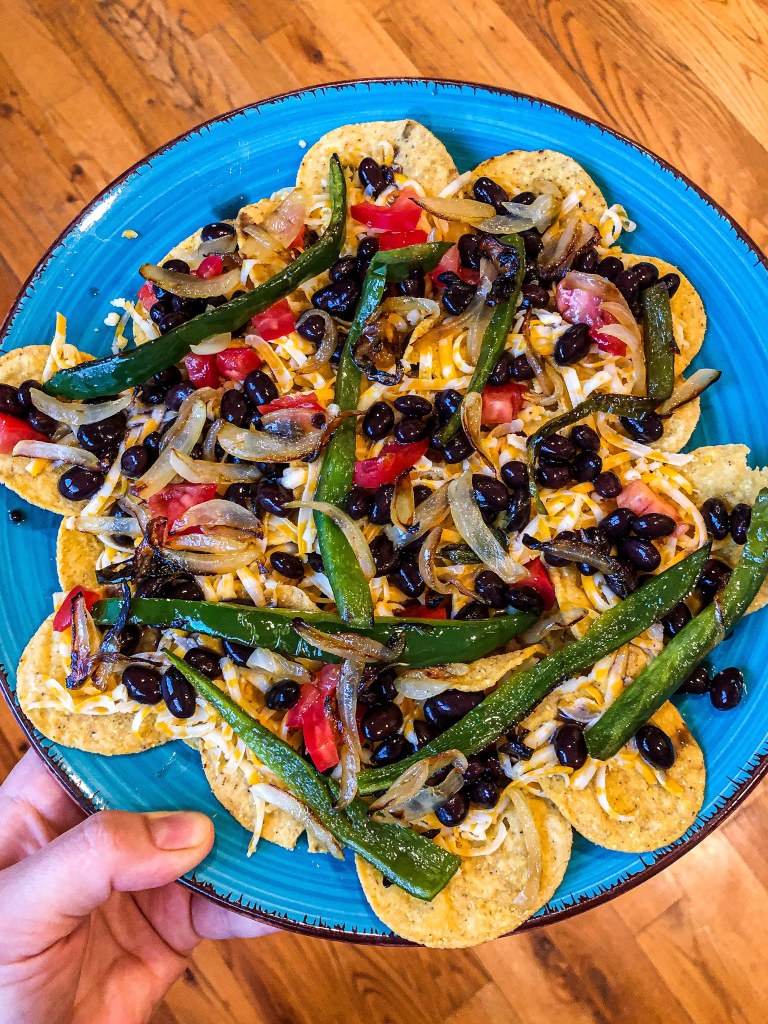
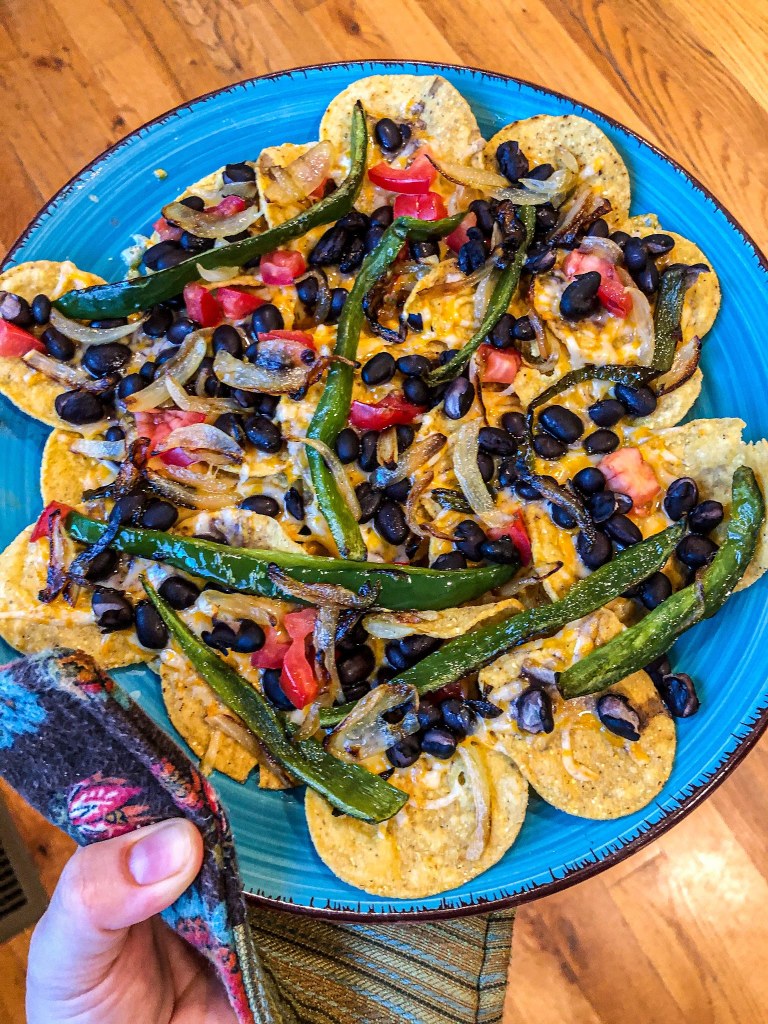
Shelby’s Nacho Salad.
Everyone has their own Nacho recipe, and can anyone actually clarify a nacho recipe as a recipe? Nachos are so similar to tacos in that, if you have the base: the tortillas or chips, you can use whatever you have. So, here is a Nacho salad recipe I made recently in order to satisfy my need for comfort food. I hope it inspires you.
Shelby’s Nacho Salad!
Nacho Salad
INGREDIENTS
Trader Joe’s Yellow Corn Round Tortilla Chips
Cheddar Cheese (Monterrey, Pepper, Extra Sharp, etc. All work), grated
Roma Tomato, diced
Olive oil
1 Poblano pepper, sliced
1 large Vidalia onion, sliced
1 can of Goya black beans
1 can of refried beans
2 ears of corn
Romaine Lettuce
1/2 cup of Light Sour Cream
1/4 packet of Taco Seasoning
Queso
Favorite salsa
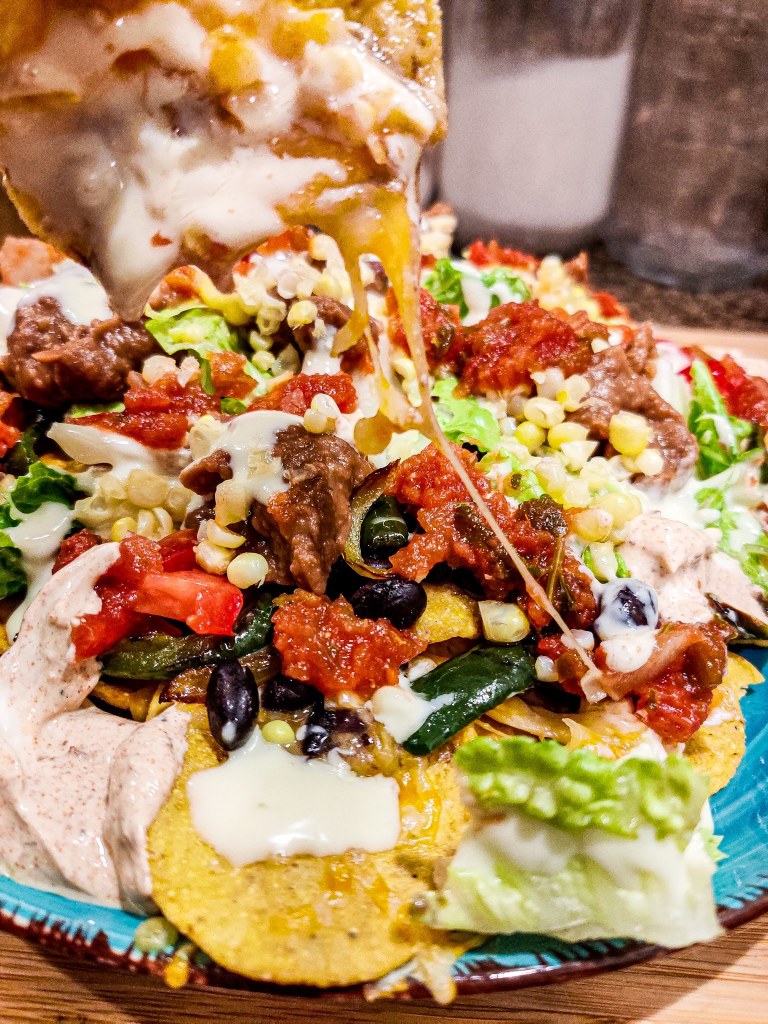
INSTRUCTIONS
Preheat the oven to 350f.
Fill a pot with boiling water, enough to fit in the two ears of corn. Once the water starts to boil, add the corn. Let boil for 5-6 minutes, then remove corn from pot.
While waiting for the water to boil, grab a saute pan, add enough olive oil to just coat the bottom of the pan, place on medium heat, and then add in the sliced onion and poblano pepper. Stirring frequently to let the veggies saute or start to brown. Once at desired state, remove from pan, and set aside. Now turn the heat on medium to high, and add the ears of corn in order to brown all around. Then remove from the pan, let cool, then cut the corn off the cob.
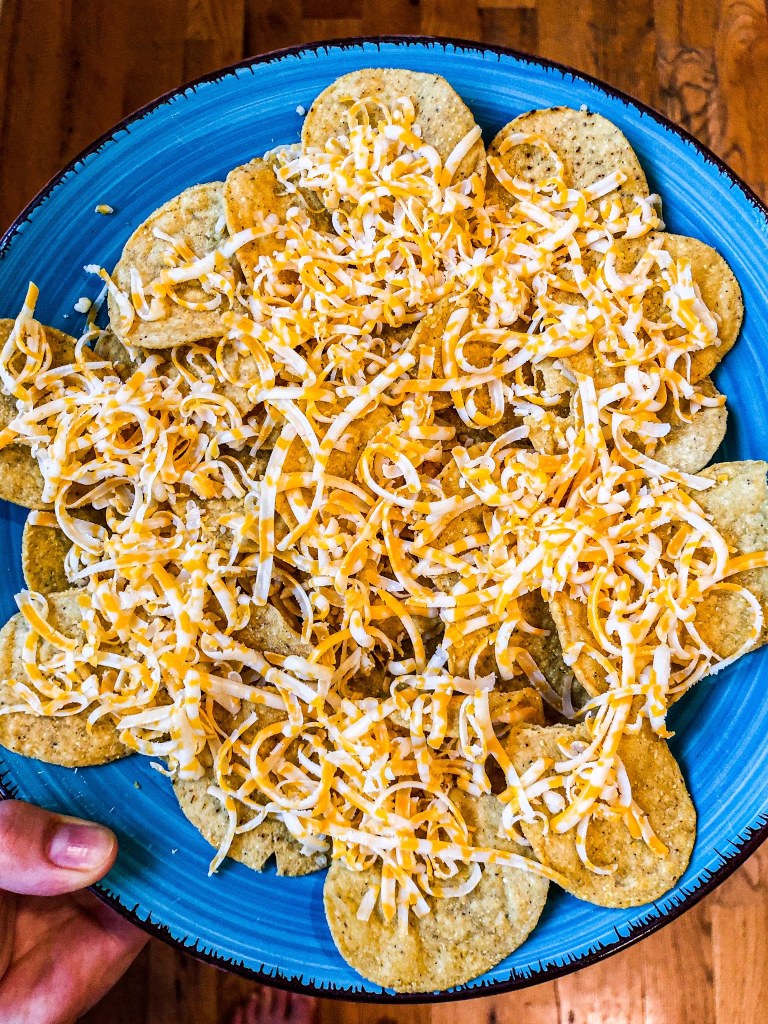
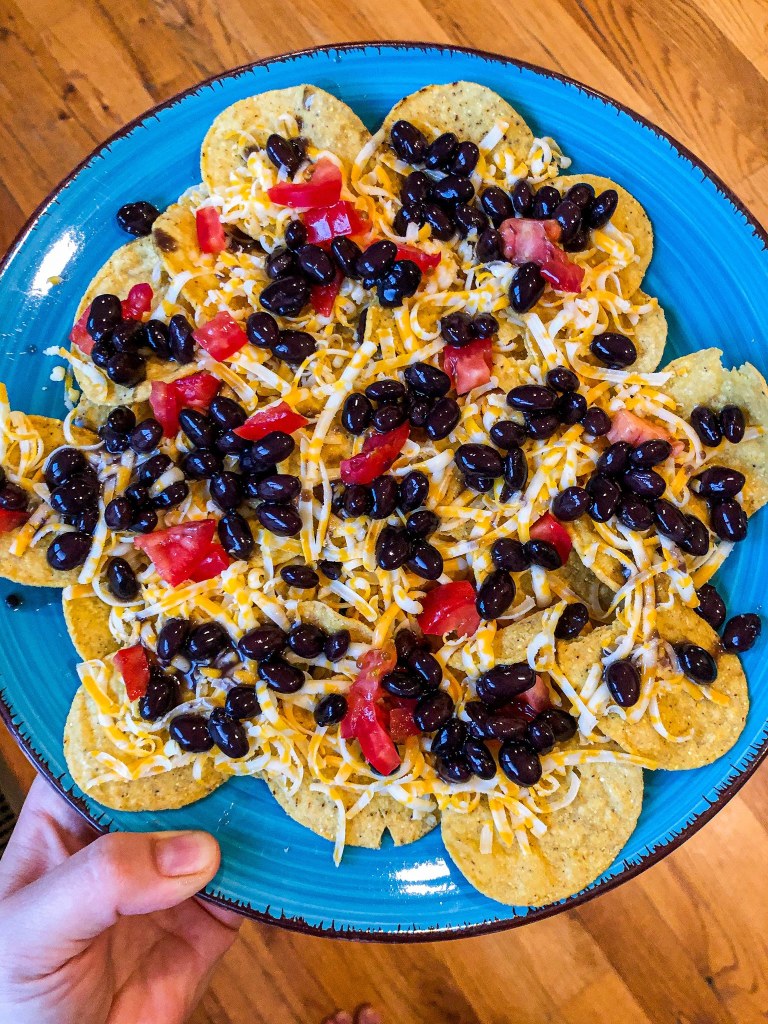
Start placing a layer of chips on a plate. I do a small base layer underneath the rest of the chips in order to have 3-4 “clean” chips to pick up all of the leftover toppings on the plate at the end.
Next, add the grated cheese, followed by the diced tomatoes, then the black beans. I then add the peppers and onions. Now it’s time to put the nachos in the oven for about 6-8 minutes. Just until the cheese is melty.
While the nachos are cooking, I prepare the rest of the toppings. The romaine is chopped. The queso is warmed enough to drizzle over the nachos, and the same is done for the refried beans. Lastly my favorite part of nachos, the sour cream and taco seasoning dip. I add a 1/4 of a package of taco seasoning to 1/2 cup of sour cream and stir together. That’s it!
Once the nachos come out of the oven I add everything else. I start by adding the romaine, then corn, followed by refried bean dollops, salsa dollops, the drizzle of queso, and finally dollops of the sour cream dip around the edge of the plate. Then it’s time to eat!
Let me know how the recipe turned out for you in the comments below!
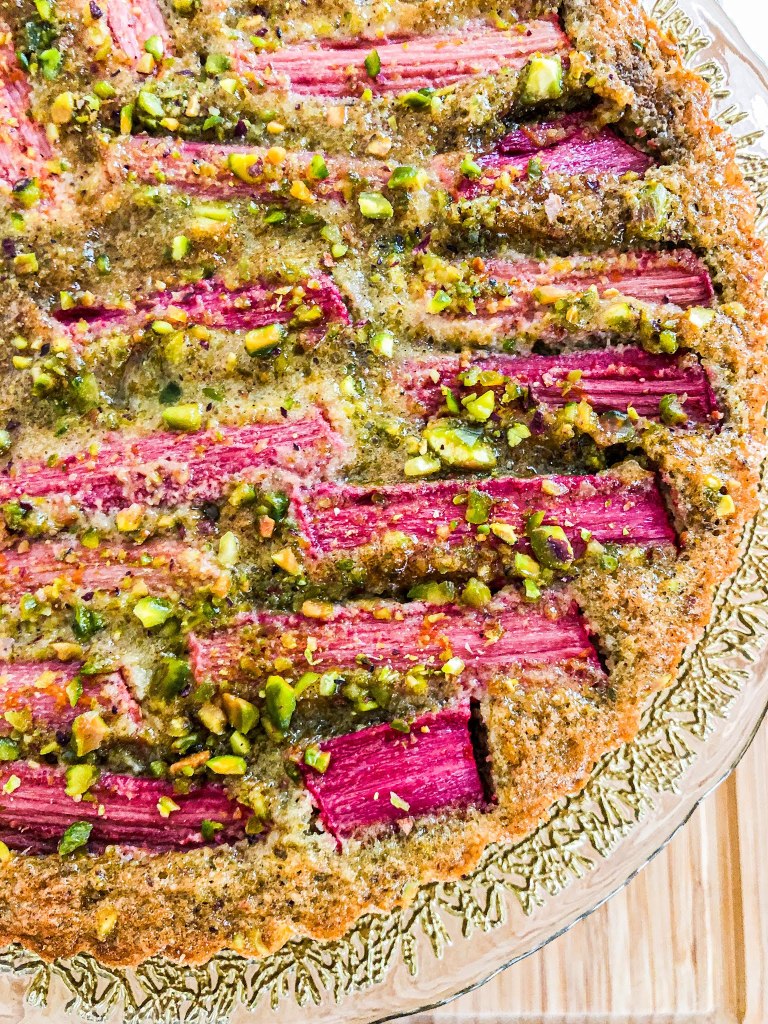
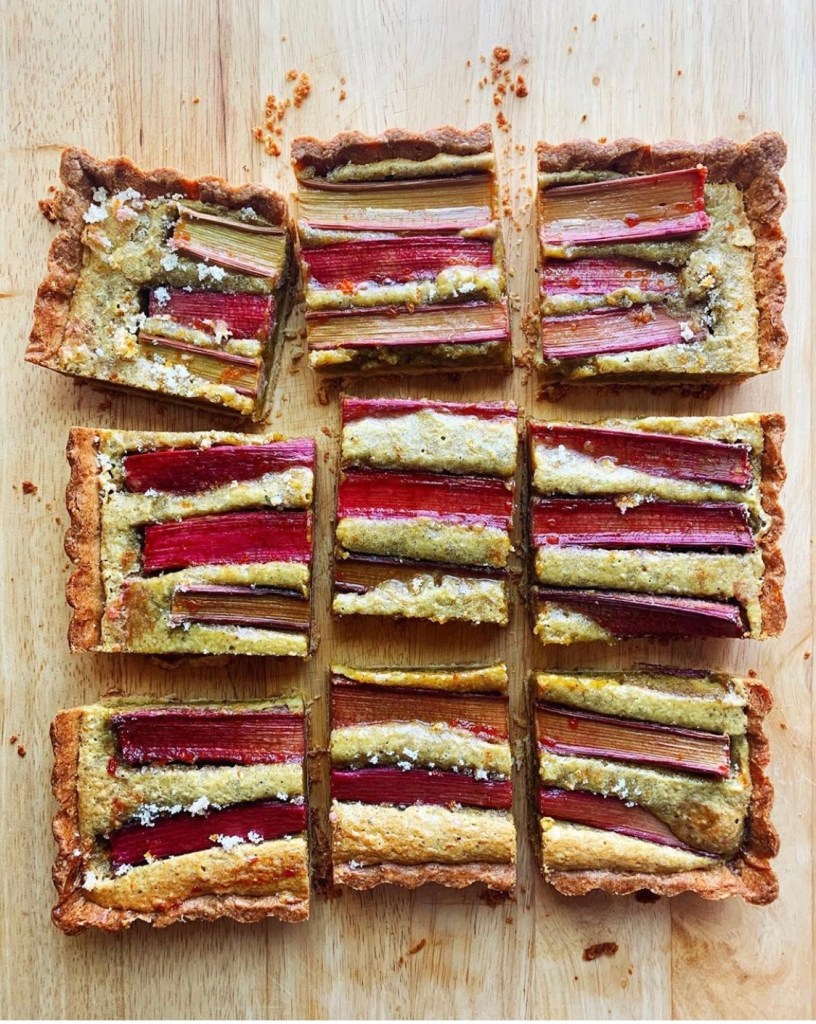
“Every spring I get rhubarb, every spring I spend hours obsessing over what to do with it, only to reverse course in the final hours. This weird choice? Pistachio frangipane and cornmeal tart crust.”
A week or so ago I was scrolling through Instagram when I came across a post from Sarah Jampel featuring a stunning Rhubarb Pistachio Frangipane and Cornmeal Tart Crust. Even though I’ve watched every season of The Great British Bake Off, saved countless tart recipes on Pinterest, and traveled throughout Europe spending a lot of time in bakeries, I have actually never eaten a tart in my life. I don’t know what to say except that I grew up on boxed brownie mix, boxed cake mix, and nestle tollhouse cookie dough from a package in the refrigerated section. I’ve also only eaten rhubarb 2-3 times in my life. Again, I don’t know what to say except that it’s not a big produce in the south.
So, I found some rhubarb at the farmer’s market, and resolved that I was going to make this tart this week. My first big challenge, is that Sarah didn’t have an actual recipe to go along with the gorgeous view. So, I found some inspiration on Youtube from The Boy Who Bakes’ tart crust and pistachio frangipane as well as a rhubarb frangipane galette from Bon Appetit and combined the three!
Was the result perfect? Absolutely not! Didn’t you just read most of this was an absolute first for me! But was it delicious? Heck yes it was.
On the left is Sarah Jampel’s Rhubarb Pistachio Frangipane and Cornmeal Tart Crust, and on the right is Shelby’s Rhubarb Pistachio Frangipane Tart!
You are absolutely going to need a scale to try to replicate this recipe (but let’s be honest we should all be using a scale when baking, right? Trial 101).
So I mostly used the recipe below, omit everything related to the strawberries. As stated earlier I used some technique from the Bon Appetit Rhubarb Galette recipe, which I will get to in a second. But back to the recipe below… I used vanilla bean paste for the crust instead of a vanilla bean pod (I’m not that fancy). I didn’t measure but I would say 1/2 – 1 teaspoon of the bean paste. Icing sugar is powdered sugar. For the ground almonds I used almond flour. I added two pinches of salt.
Now, it calls for very cold butter, so I pulled out frozen butter. I believe this was TOO cold of butter for the dough to come together. Just pull your butter from the fridge. I had to add 4 tablespoons of ice water for this reason, which did ultimately shrink the edges of my tart crust as The Boy Who Bakes warned of in the tart crust recipe video. It also took closer to 40 minutes for my blind bake to actually bake, instead of the 20-25 minutes stated in the recipe.
For the frangipane, I followed the recipe but I ground up a few more pistachios over almond, because hello it’s a pistachio frangipane (but this might be why it took so long to never fully bake).
For the rhubarb, I chopped it into smaller pieces and tossed it with zest of an orange, the orange juice, and some sugar to macerate it a little (hello bon appetit technique).
25 minutes after the frangipane and rhubarb had been baking in the tart crust, the filling was still wobbly, but was browning quickly on top. I didn’t know if this was normal, and read online that during the overnight cooling process it would set. So, all this to say, I don’t believe I actually baked it all the way through.
After all of this, the tart was still absolutely delicious and I hope Sarah creates an actual recipe for it someday.
Sweet Pastry 400g plain flour 1 vanilla bean pod (optional) 35g ground almonds 75g icing sugar pinch of salt 250g unsalted butter, chilled and diced 2 large egg yolks about 1 tbsp ice cold water
Cut the vanilla pod, if using, in half and scrape out the seeds. Put the seeds in the bowl of a food processor, add the flour, almonds, icing sugar and salt, and pulse to combine. Add the butter and pulse until the mixture resembles breadcrumbs. Add the egg yolks and water and pulse until fully combined. (Alternatively, put the flour, almonds, icing sugar, salt and vanilla in a large bowl and mix to combine. Add the butter and rub together using your fingertips, or use a pastry cutter, until the mixture resembles breadcrumbs. Add the egg yolks and water and mix together until the dough just starts to come together.) Be careful not to over-process the dough, or the finished pastry will be tough and chewy, you only want to mix the dough until it starts to clump together, not until it forms a uniform dough.
Turn the dough out onto a lightly floured work surface and gently bring together with your hands, very gently kneading into a smooth, uniform dough. Divide into two pieces, pressing into flat rounds. Wrap the pastry in clingfilm and rest it in the fridge for at least 1 hour before using.
As with most pastry, this can be chilled and kept for up to one week before using, or it can be frozen for up to a months. This recipe is enough for two large tarts so you can either make a half batch or use one portion for another recipe.
Preheat the oven to 180C (160C fan). Take the disc of pastry out from the fridge and lightly flour the work surface with a little flour. Roll the pastry out until it is about 3mm thick. Roll back onto the rolling pin then gently unroll into a 9 inch loose bottomed tart tin. Gently lift up the excess pastry and press it into the corners of the tin, if you press the pastry in without lifting it up, you risk stretching or ripping the pastry and if it stretches its more prone to shrinkage.
Trim off the excess pastry and refrigerate the tart shell in the fridge until the pastry is firm. Line the tart with a crumpled piece of parchment paper and fill with rice. Bake in the preheated oven for about 25 minutes then remove the rice and parchment and bake for a further 5-10 minutes just until the top edge of the tart shell is browning and the base is set but with just a hint of colour. Remove from the oven and allow to cool then brush all over with a beaten egg yolk and bake a further minute or so until set, this will prevent the pastry from becoming soggy when we add the frangipane.
To make the frangipane place the butter, sugar and lemon zest into a large bowl and using an electric mixer beat together until light and fluffy, about 5 minutes. Beat in the eggs one at a time then mix together the dry goods and stir into the butter mixture, mixing until fully combined. Spread the frangipane inside the tart shell and sprinkle with a few extra chopped pistachios (optional). Bake in the preheated oven for about 25 minutes or until the frangipane is lightly browned and springs back to the touch. Remove from the oven and set aside to cool fully.
For the topping slice the stalk from the strawberries and cut in half, placing into a bowl. Sprinkle the sugar over the strawberries (if they are rally flavourful and sweet they will only need 1 tablespoons if they need a little extra boost in flavour use the full 2 tablespoons) and set aside for about 30 minutes to macerate, this will help boost the flavours and draw out some of the moisture which also looks great on the finished dish. To finish top the tart with the strawberries and sprinkle with a few chopped pistachios.
Once the tart is topped with the strawberries it is best the day served but you can make the tart a day or two in advance just doing the strawberries when ready to serve.
Let me know how the recipe turned out for you in the comments below!
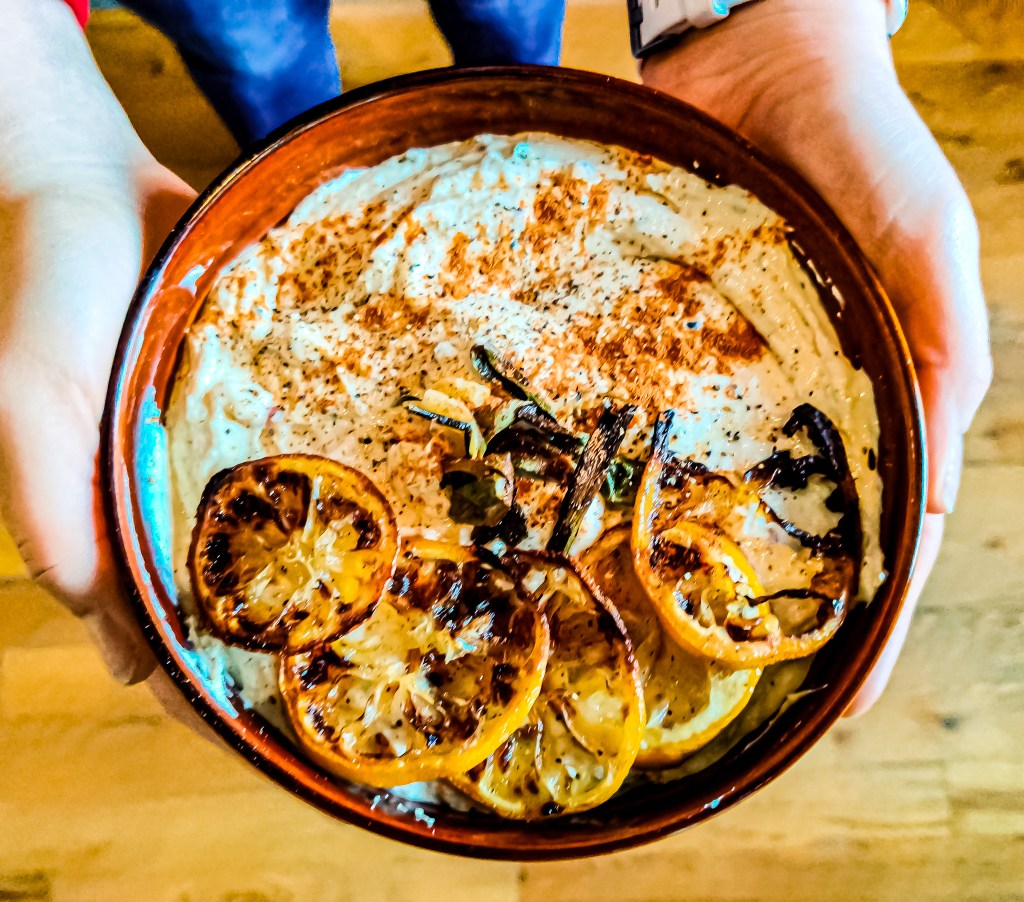
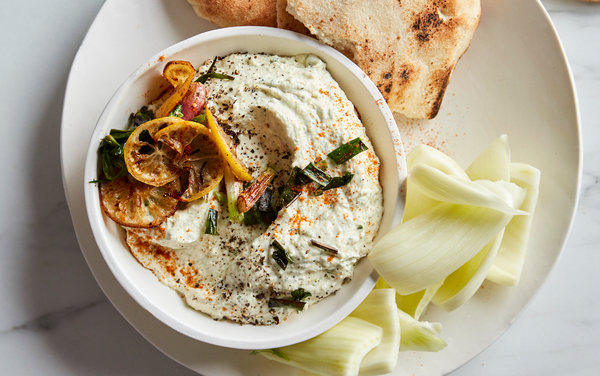
“Whipped feta is wonderful on its own, but for a smoky sweetness that makes it special, flavor the dip with scallions that have been blackened in the oven. Serve with pita chips or buttery crackers, and if you’re an overachiever, top the dip with charred cherry tomatoes and a drizzle of honey.“
Shelby’s Lemony Whipped Feta With Charred Scallions.
Three weeks before quarantine began, I made this delicious Lemony Whipped Feta With Charred Scallions dip to take to a dinner party. It was a hit, and I ended up snacking off of it for a week!
Now we are officially two months into quarantine, and I’m sorely missing dinner parties, or cooking for friends. So this post is in memory of a recent dinner that I thoroughly enjoyed, and I’m wishing I could do again sooner rather than later.
On the left is Sarah Jampel’s Lemony Whipped Feta With Charred Scallions, and on the right is Shelby’s!
I followed this recipe EXACTLY as written. I used the exact ingredients that were required, and followed all of the steps in order as well.
I was going to make homemade pita chips to go along with these chips but ended up buying some because I was too busy that day. Hah, I wish that was the case again.
Anyway, bookmark or pin this recipe to return to for the next dinner party you host, or make it this week if you want something to snack on.
10 ounces feta cheese, broken into large pieces (about 2 1/2 to 3 cups)
4 ounces cream cheese, at room temperature, or heavy cream
¼ teaspoon black pepper, plus more for garnish
¼ teaspoon cayenne, plus more for garnish
1 tablespoon hot water
INSTRUCTIONS
Heat the broiler and line a sheet pan with foil. Juice 1 whole lemon to get 3 tablespoons juice and set aside. Cut the remaining 1/2 lemon into 3 to 4 thin slices.
In a medium bowl, toss together the lemon slices, scallions and 1 tablespoon olive oil. Place on sheet pan and broil until blackened, tossing occasionally, 7 to 9 minutes for the scallions and about another 5 minutes for the lemon slices. Transfer to a cutting board to cool slightly.
In a food processor, add the feta, cream cheese, remaining 1/3 cup plus 2 tablespoons olive oil, reserved lemon juice, black pepper, cayenne and hot water. Purée until very smooth, then add almost all of the scallions (save 1 or 2 pieces and chop roughly for a garnish). Pulse to combine, leaving some chunky scallion pieces. Taste for lemon, adjusting as needed.
Transfer to a bowl, then garnish with charred lemon slices, the reserved scallion, black pepper and a pinch of cayenne.
Let me know how the recipe turned out for you in the comments below!
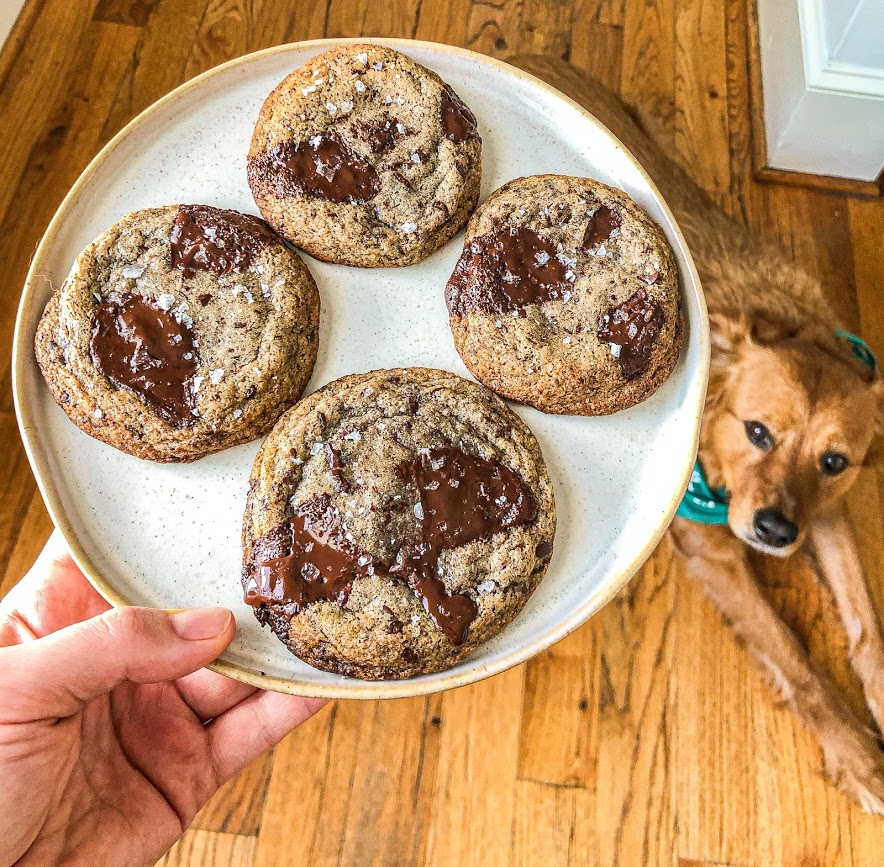
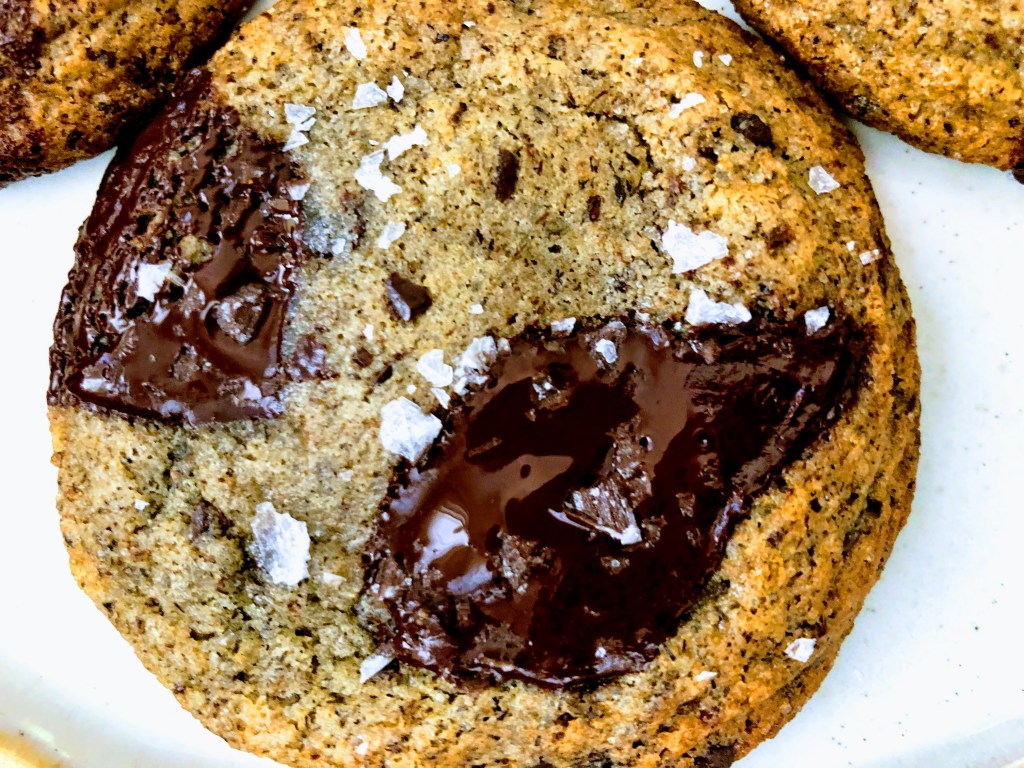
“…not just any chocolate chip cookie. This one, which gets its speckled look, earthy, nutty flavor, and chewy middle from buckwheat flour, might just become your new favorite. “
Bon Appetit has a sub-site called Basically which helps teach people how to be better cooks, and I am so glad it exists. Basically came out with a 10-week “Better Baking Challenge” and these cookies were week one. I can’t believe I waited until quarantine to make these cookies, because they are phenomenal.
Let’s get baking!
On the left is Bon Appetit’s Salty Buckwheat Chocolate Chip Cookies, and on the right is Shelby’s!
I followed this recipe EXACTLY as written. I used the exact ingredients that were required, and followed all of the steps in order as well.
The flaky salt on top is not optional, nor are the chocolate chunks from a bar. Chips will not suffice.
After watching the recipe videos for these cookies, I truly had an understanding of why people should stick to recipes when it comes to baking. They are written that way for a reason. Especially the Bon Appetit recipes, they are all tested for perfection.
I baked these cookies for 8 minutes and they were soooooo ooey gooey on the inside I couldn’t resist. I only made as many cookies as I wanted and froze the rest until I needed a cookie fix. Then I defrosted the cookies in the fridge for a couple of hours before baking. OH-MMM-GEE I cannot tell you enough how good these cookies were.
½ cup (1 stick) unsalted butter, cut into 8 equal pieces
1 cup (125 g) all-purpose flour
½ cup (63 g) buckwheat flour
½ tsp. baking powder
½ tsp. baking soda
1¼ tsp. Diamond Crystal or ¾ tsp. Morton kosher salt, plus more
6 oz. bittersweet chocolate (65–75% cacao) bars or wafers (disks, pistoles, fèves)
⅔ cup (133 g; packed) light brown sugar
½ cup (100 g) granulated sugar
1 large egg
2 large egg yolks
1 tsp. vanilla extract
INSTRUCTIONS
Heat ½ cup (1 stick) butter in a small saucepan over the lowest heat possible until melted (you don’t want it to sputter or brown), about 5 minutes.
Meanwhile, whisk 1 cup (125 grams) all-purpose flour, ½ cup (63 grams) buckwheat flour, ½ tsp. baking powder, ½ tsp. baking soda, and 1¼ tsp. Diamond Crystal or ¾ tsp. Morton kosher salt in a medium bowl.
Coarsely chop 6 oz. bittersweet chocolate. Set aside a handful of chocolate in a small bowl.
Scrape butter into a large bowl and add ⅔ cup (133 grams) brown sugar and ½ cup (100 grams) granulated sugar. Whisk vigorously until butter has been absorbed into the sugar and no big lumps remain, about 30 seconds.
Add 1 large egg, then 2 large egg yolks, one at a time, whisking until fully combined after each addition. Whisk in 1 tsp. vanilla extract. At this point, your mixture should look much lighter in color and be smooth, almost creamy.
Add dry ingredients and use a rubber spatula or wooden spoon to stir until just incorporated and almost no dry streaks remain. Add chopped chocolate (but not the chocolate you reserved in the small bowl) to batter. Gently mix just to distribute. Cover bowl with an airtight bowl cover, a kitchen towel, or plastic wrap and chill 2 hours. (If you’re crunched for time, 1 hour will do, but cookies will be best after 2.)
Place racks in upper and lower thirds of oven; preheat to 375°. Using a tablespoon measuring spoon, scoop out scant 2-Tbsp. portions of dough (or, if you have a scoop, this is a leveled-off #30 or a heaping #40) until you have 10 portions divided between 2 parchment-lined baking sheets (you want five per sheet—these will spread a bit!). Roll portions into balls and gently press a piece or 2 of reserved chocolate into each one. It’s okay to cram the chocolate on there—some pieces can even be vertical. Cover and chill any remaining dough.
Bake cookies, rotating baking sheets top to bottom and front to back halfway through, until edges are golden brown and centers are puffed, 8–10 minutes. (Pull at 8 if you like your cookies softer and want to guarantee they’re still soft the next day!)
Working one at a time, pull baking sheets out of the oven and tap lightly on the stove to deflate cookies. Sprinkle with Diamond Crystal kosher salt (if you’re using Morton, skip it: the crystals are too large). Let cookies cool on baking sheets 5 minutes, then transfer to a wire rack and let cool completely. Let baking sheets cool (to do this fast, run them under cold water), then turn parchment paper over. Repeat process with remaining dough, dividing evenly between baking sheets, to make 6–8 more cookies.
Let me know how the recipe turned out for you in the comments below!
In the fall of last year, my husband and I stayed at this amazing farmhouse called Bliss Farm Retreat, and earlier this week we found out that one of co-founders passed away. The co-founder was a vibrant, down-to-earth, man who you could tell was a big part of his community. There were a few of us staying at the farmhouse and each morning we all gathered in their large dining room for a breakfast he made. I’ve been thinking about him all week since I discovered the news of his passing, because he left a big impression on me. Also, the food he made was absolutely amazing.
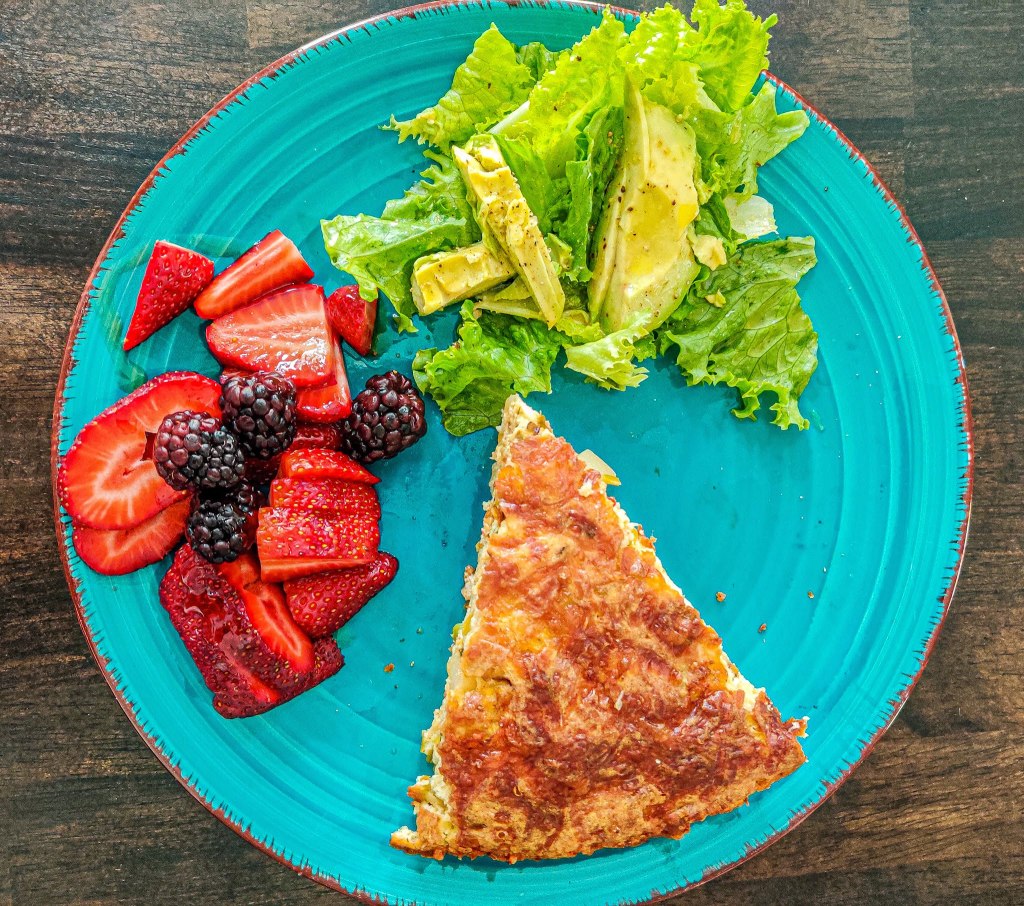
In honor of Frank King, breakfast.
One of the mornings he made a frittata with a side of fresh artisan bread (with jam) and a small salad. It was truly delicious and wholesome. So, in his honor, I decided to make a frittata, side salad, and some fruit for breakfast.
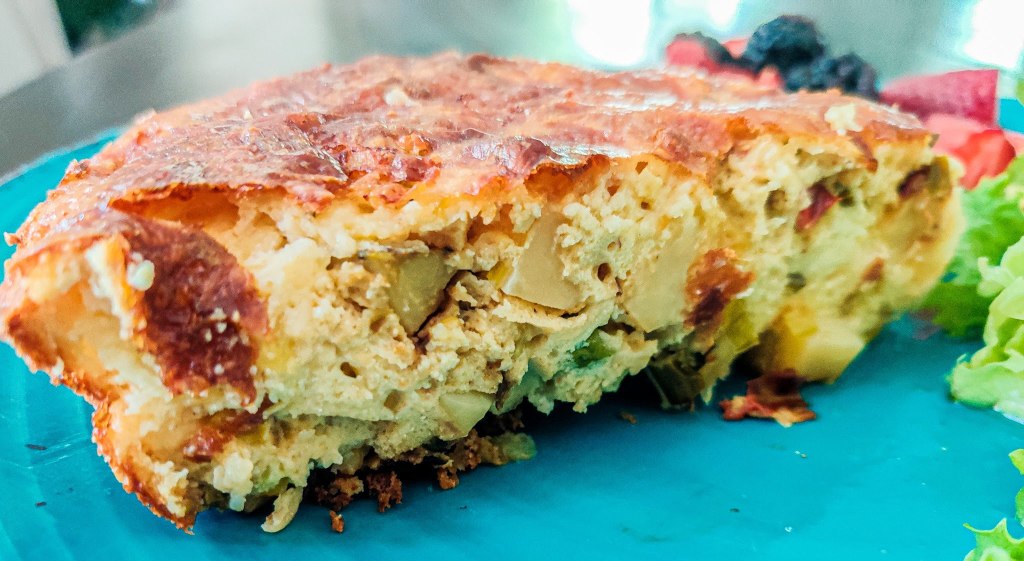
More on the recipe: I used Ina Garten’s Potoato Basil Frittata, but made a lot of changes.
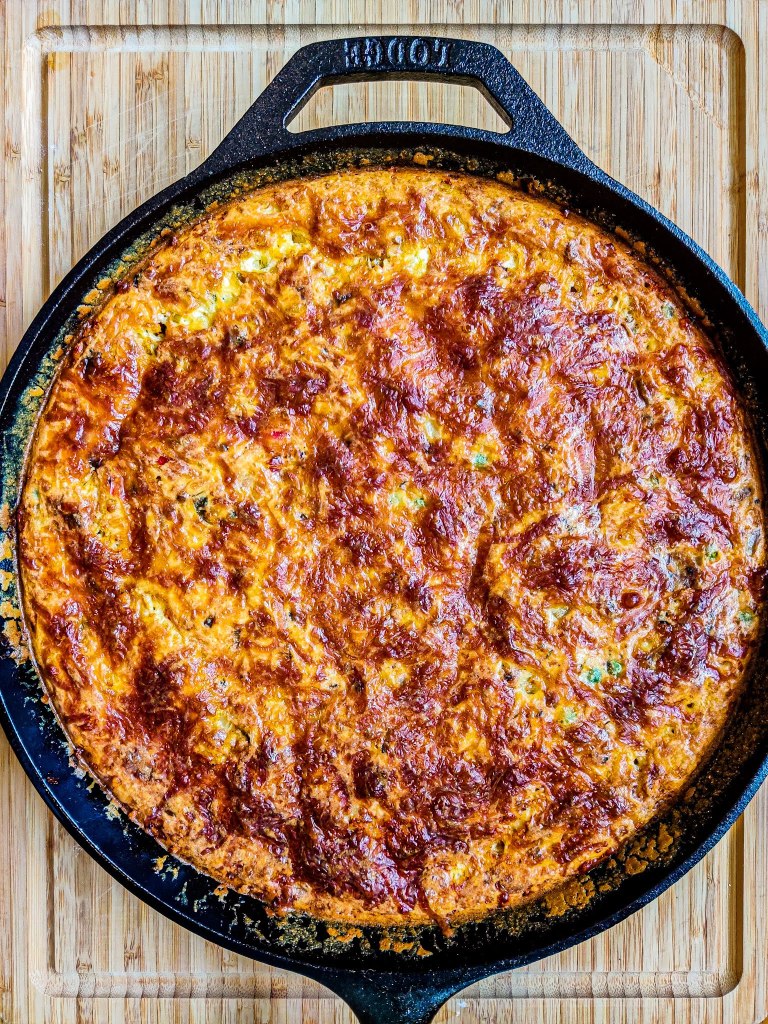
On the left is Ina Garten’s Potato Basil Frittata, and on the right is Shelby’s Potato Leek Frittata!
First things first, you WILL NEED a 10″-12″ cast iron skillet that is well seasoned to make this frittata.
I followed Ina’s recipe, except I changed up the veggies and greens that were added. I felt confident about this decision as I saw on Instagram that frittata’s are a great way to use up vegetables in your fridge. I had some leeks and a red bell pepper that were in great need of being used up TODAY.
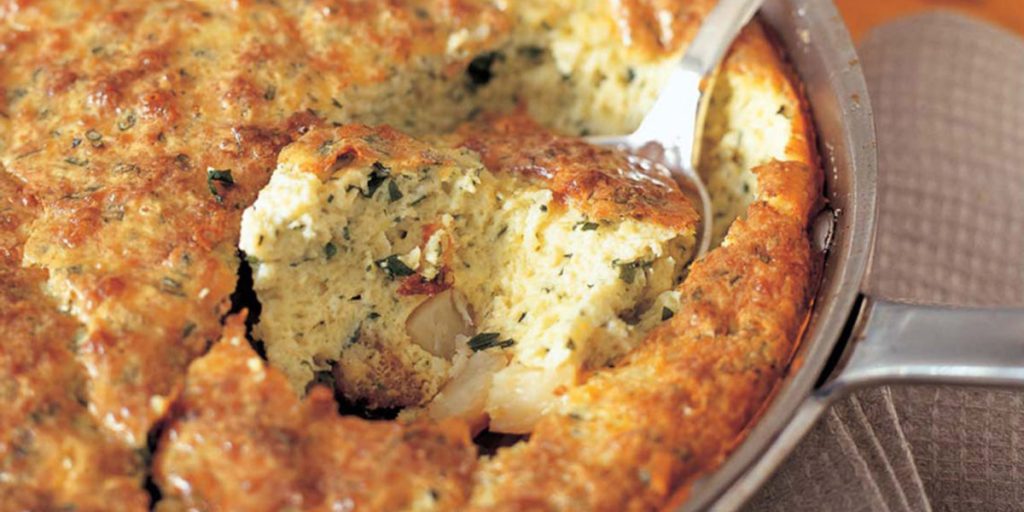
I added the butter to the skillet for only log enough to let it melt, then added the leeks, potato, and red bell pepper to the cast iron skillet all at once. I let the potato and leeks soften and brown for 15ish minutes. I took it off the heat and added (maybe) 1/2 cup of frozen peas. I didn’t want the peas to cook anymore than they would in the oven. I then added the egg, ricotta, cheese, melted butter mixture and mixed in the veggies that were already in the skillet. For the egg/cheese mixture, I didn’t have a full 3/4 pound (15 ounces) of Gruyere so I added some shredded mozzarella to make up for it. I also sprinkled the same mozzarella on top of the frittata before placing in the oven and cooking for 53 minutes.
Ina keeps the recipe pretty easy. Just follow the egg mixture accordingly and add in whichever veggies you want.
The results? IT WAS DELICIOUS!! I asked my husband if he wanted this for breakfast and received an emphatic NO. I made it anyway, and then he ended up eating TWO whole slices. He also mentioned how good it was (he is hard to please). Feel free to make the way I did.
2 cups peeled and 1/2-inch-diced boiling potatoes (4 potatoes)
8 extra-large eggs
15 ounces ricotta cheese
3/4 pound Gruyère cheese, grated
1/2 teaspoon kosher salt
1/2 teaspoon freshly ground black pepper
3/4 cup chopped fresh basil leaves
1/3 cup all-purpose flour
3/4 teaspoon baking powder
INSTRUCTIONS
Preheat the oven to 350 degrees.
Melt 3 tablespoons of the butter in a 10-inch oven-proof omelet pan over medium-low heat. Add the potatoes and fry them until cooked through, turning often, 10 to 15 minutes. Melt the remaining 5 tablespoons of butter in a small dish in the microwave.
Meanwhile, whisk the eggs in a large bowl, then stir in the ricotta, Gruyère, melted butter, salt, pepper, and basil. Sprinkle on the flour and baking powder and stir into the egg mixture.
Pour the egg mixture over the potatoes and place the pan in the center of the oven. Bake the frittata until it is browned and puffed, 50 minutes to an hour. It will be rounded and firm in the middle and a knife inserted in the frittata should come out clean. Serve hot.
Let me know how the recipe turned out for you in the comments below!
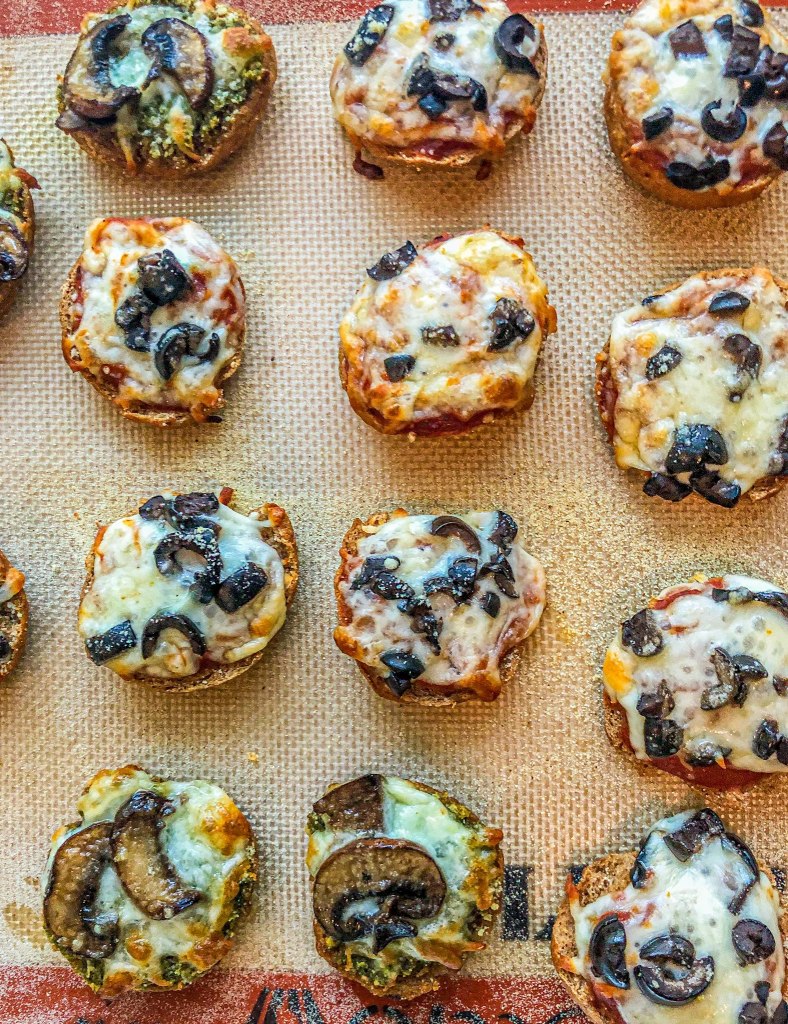
While binge-watching Bon Appetite’s YouTube channel, I watched the Gourmet Makes episode where Claire Saffitz makes bagel bites. It is the only episode where I watched and thought, wow, that actually looked fun to make and I want to try! I’m not a fan of the original bagel bites but I am a fan of bagels, and pizza. So I got started!
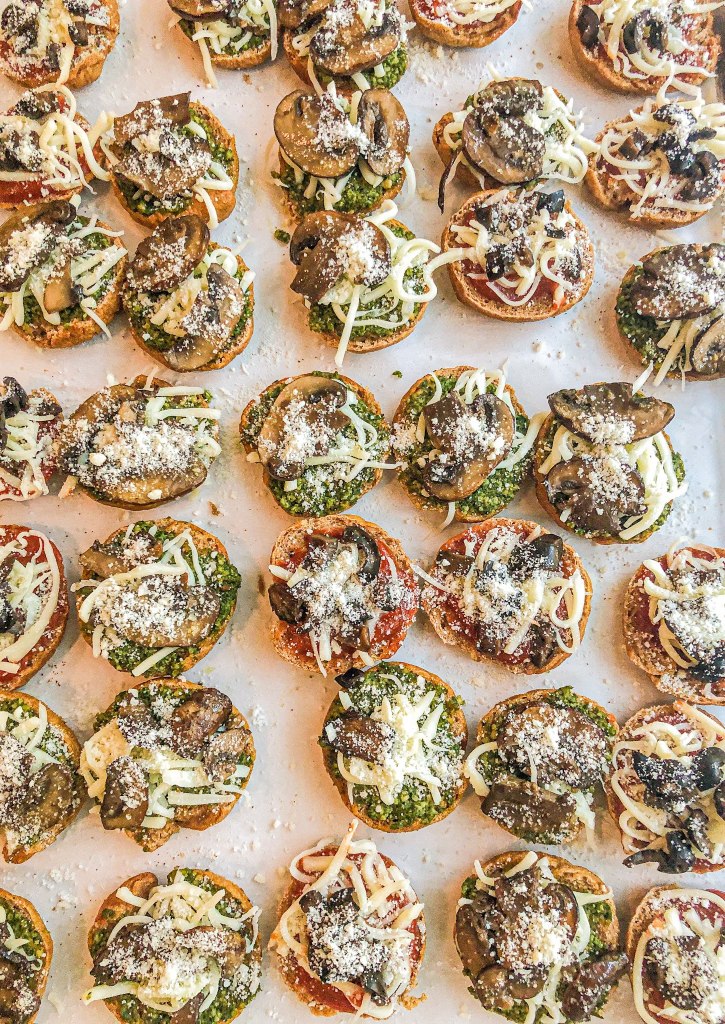
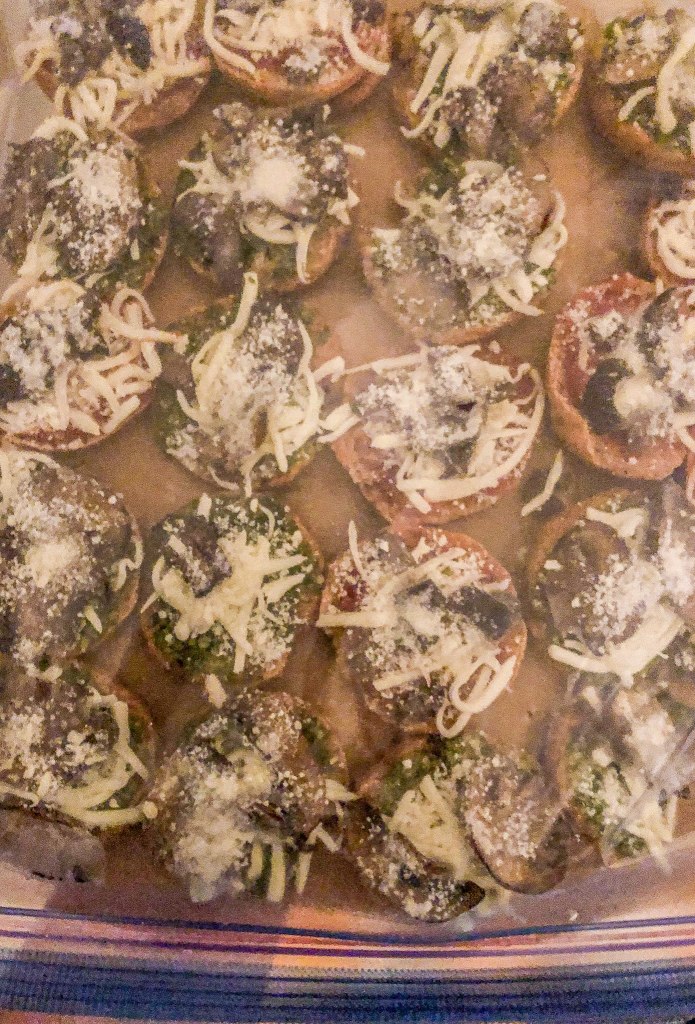
Shelby’s Bagel Bites!
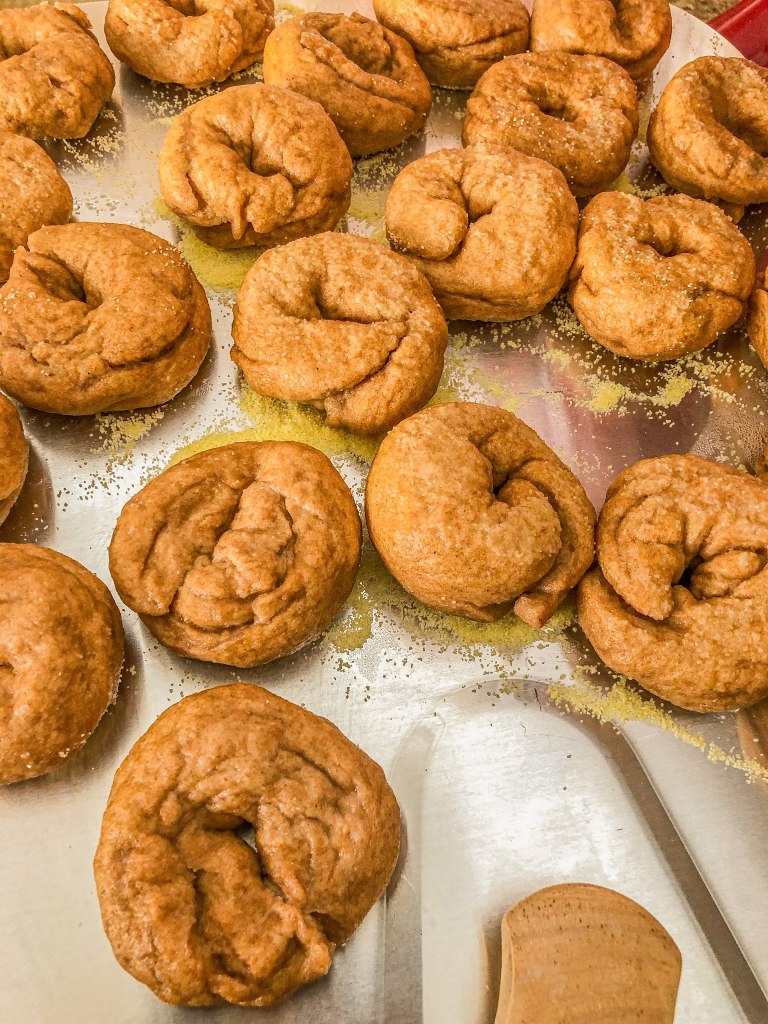
I wrote out Claire’s recipe from the episode but ended up making Peter Reinhart’s Whole Wheat Bagels, I used Trader Joe’s pizza sauce, shredded mozzarella, black olives, sauteed mushrooms, and a homemade carrot pesto sauce that was in the freezer.
The bagels were surprisingly easy to make. Don’t try the snake method, you’ll notice a lot of them came undone that way.
To proof the yeast, combine one teaspoon active dry yeast and two tablespoons lukewarm water in a small bowl, and stir until the yeast is dissolved. Set aside until the mixture is foamy. To make the dough, combine three and a half cups bread flour and one and a half teaspoons kosher salt in a large bowl. Make a well in the center and pour in one tablespoon barley malt syrup, one cup of room temperature water, and the yeast mixture.
Mix until a shaggy dough forms, then turn it out onto the work surface and knead by hand, adding more flour as necessary to prevent sticking until you have a smooth, very firm dough that is only slightly tacky. Form into a ball, cover, and let sit in a warm spot until nearly doubled in size.
Uncover the dough and punch down lightly. Portion the dough into three quarter ounce pieces, then form each piece into a ball. Poke a hole in the center of each ball, and form into a ring about two inches across, then flatten slightly and place on a cornmeal dusted parchment lined baking sheet. Cover and refrigerate overnight.
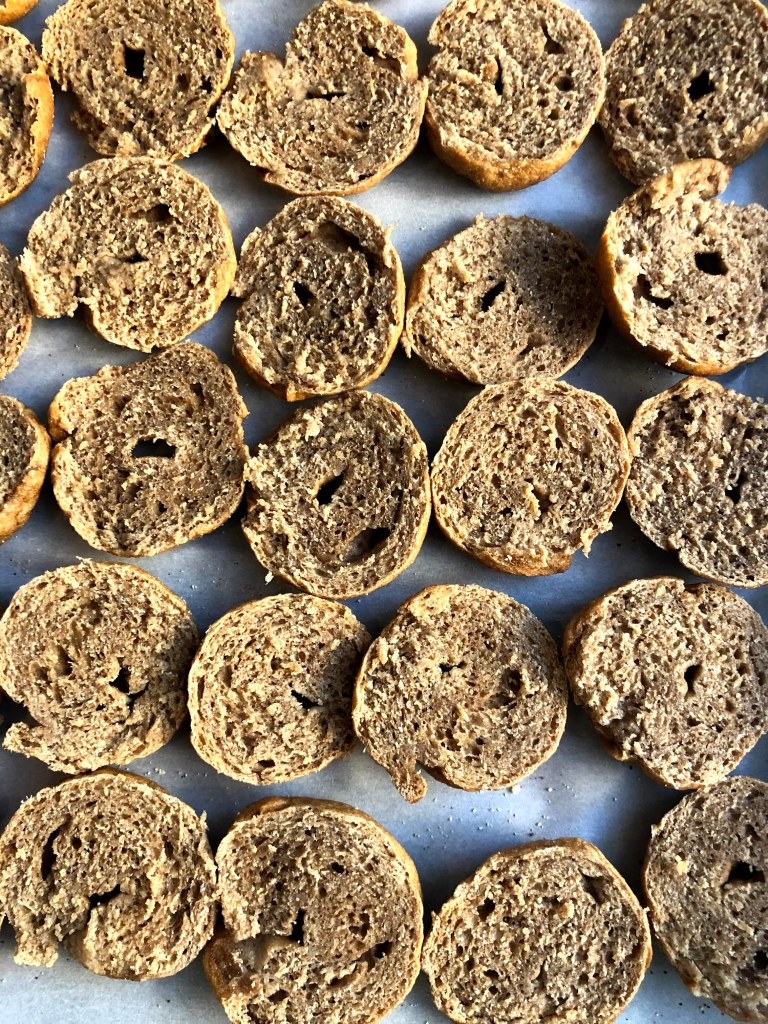
The next morning, check to see if the bagels pass the float test by placing one in a bowl of water. If it floats, return the baking sheet to the refrigerator while you prepare the boiling liquid. Fill a large dutch oven with water, add barley malt syrup to the water by the tablespoon until it’s the color of black tea.
Bring to a boil. Boil the bagels a few at a time for one minute turning halfway through, then use a spider to transfer to a bowl of ice water to cool the bagels. Pat the bagels dry, place on a cornmeal-dusted peel, then transfer to a baking stone preheated in a 450-degree oven. Bake until the bagels are deep golden brown, then remove from the oven and let cool completely.
Making the Sauce:
Meanwhile, make the tomato sauce. Lightly crush and drain a 28 ounce can of whole peeled tomatoes and let sit in a colander to drain further. Cook four smashed and peeled garlic cloves in three tablespoons of olive oil in a large saucepan over medium heat until lightly browned, then stir in a quarter teaspoon of red pepper flakes and three tablespoons tomato paste, and cook, stirring constantly, until the paste is caramelized. Add the drained tomatoes and a splash of their juices to dissolve any brown bits on the bottom of the pot, and season with salt and a pinch of dried oregano.
Throw in two big sprigs of basil and transfer to a 300 degree oven. Cook the sauce, stirring once, until very thick and concentrated, about 40 minutes. Let cool completely, then pluck out the basil and pulse the mixture in a food processor to smooth it out. Season with more salt, and let cool.
Halve the bagels and spread with a thin layer of tomato sauce. Top with finely-shredded low moisture mozzarella cheese, a sprinkle of finely grated Parmesan cheese, finely-diced pepperoni, and a drizzle of olive oil. Freeze the bagels overnight, then microwave or bake according to package instructions.
Let me know how the recipe turned out for you in the comments below!